
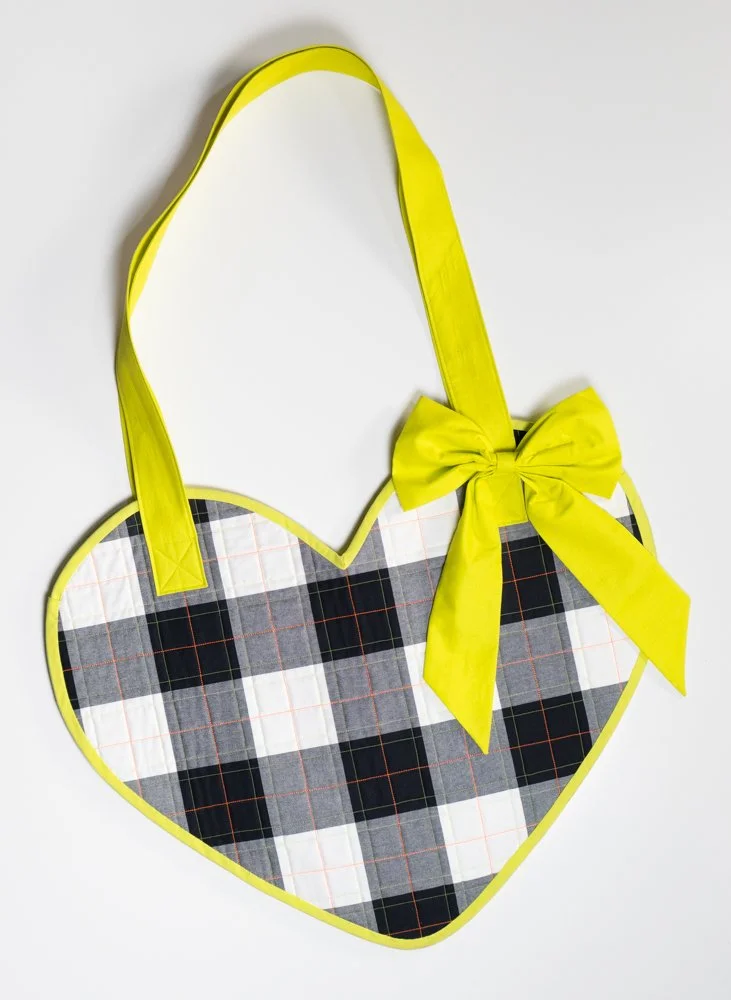
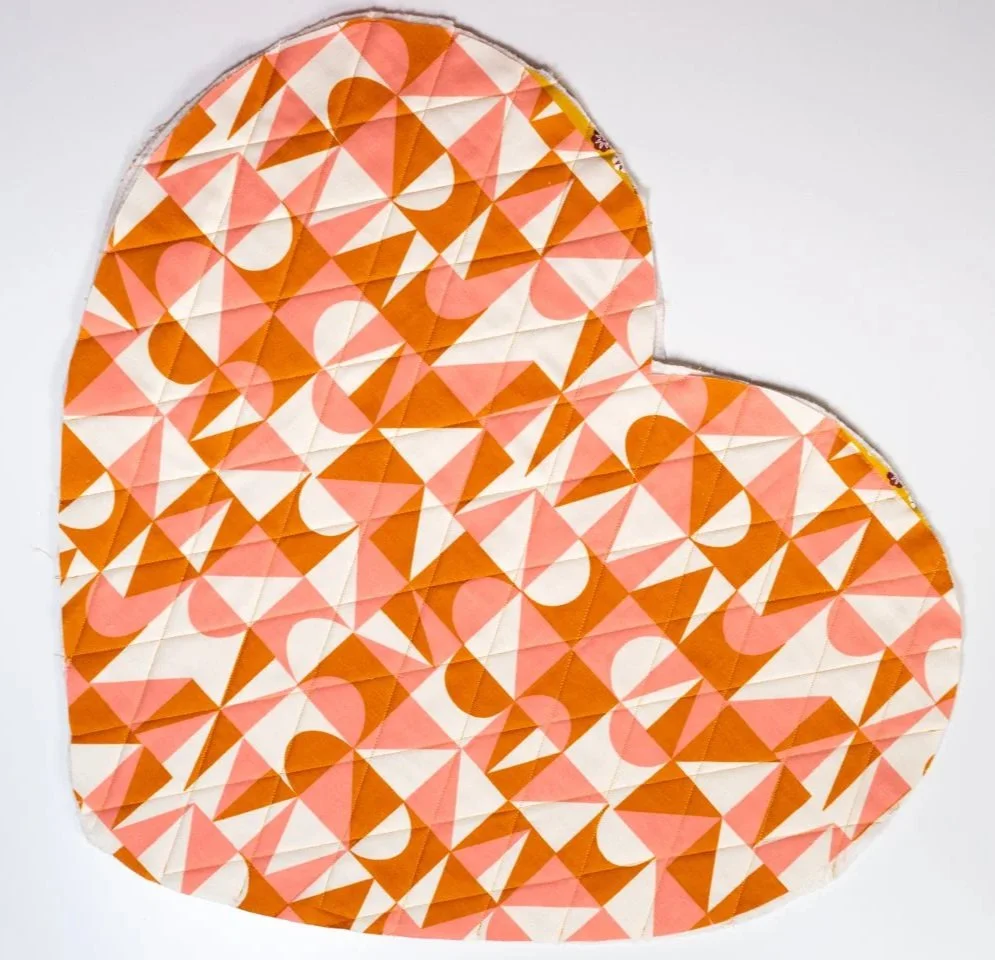
Giant Heart Bag Tutorial
I’m a big lover of bags and if you’ve spent more than one day with me, you’ll know I swap them out constantly. They’re the easiest accessory to make and compliment a look, plus they’re so simple to customize. Basically, once I realized I could use my imagination to dream up any bag I wanted, my free will went into overdrive and I can’t stop making them.
This bag came out of a fever dream and frustration at not finding a pattern that fit my vision. I searched for heart bag patterns, but they all were too small, had 80 pockets I’d never use or required a zipper - a big no thanks. I wanted a bag that was oversized for shoving things in without having to undo a zip, plus I wanted it to be so easy that I could sew it the day before Quiltcon. Thus, the Giant Heart Bag pattern was born!
A few important notes before you begin:
This pattern is beginner-friendly and I wrote this blog-based photo tutorial to help walk you through the process, especially if you’re new to sewing bags.
If you’re a boss who doesn’t need the tutorial aspect and you just want a written pattern, you can buy it on my shop for $5. All sales help me afford my own long arm, so please think about dropping a fiver to help me live my quilty dreams!
This bag requires an interfacing that a lot of quilters may not have - Decor Bond, a heavy weight option that offers a stiffer finished product that’s just the right amount of pliable. I highly recommend buying it for this bag, as it helps the heart keep its shape without flopping around. My butterfly bag (tutorial coming soon!) uses the same interfacing, so if you like this bag style, you’ll have another pattern to use it for very soon!
This is a great opportunity to practice quilting designs on your domestic sewing machine and I can’t recommend the book Walk by Jacquie Gering enough. It’s a great start to learn the basics and comes with some really fun geometric designs! (P.S. That link is to Thriftbooks, my favorite online bookstore!)
The detachable bow is not part of the pattern, but it’s super easy to make! Find the tutorial soon on my blog!
Bias binding is a must as it’ll be stitched around curves. I highly suggest making your own or buying pre-made bias tape! I’ll have a tutorial for making your own bias binding soon, but for this pattern I’ll be using pre-made bias tape.
Ok, enough talking, let’s get on to the fun stuff!

Supplies:
Fabric for the outside, 1 yard
I suggest using quilting cotton or canvas for the outside, anything you can quilt through.
Fabric for the lining, 1 yard
I suggest quilting cotton for the lining.
Fabric for the handles, ¼ - ½ yard
I suggest quilting cotton or canvas for the handles.
About the yardage: Your handles will measure 4½ x 43” once cut. If your fabric truly measures 44” selvedge to selvedge, you just need two strips cut to 4½ x 43”. This method will only require ¼ yard!
If you’re using prewashed fabric or have a brand that’s closer to 42” selvedge to selvedge, you’ll need three strips cut to 4½” x WOF. Then you’ll sew the three strips together and cut two pieces measuring 4½ x 43”. This method will require ½ yard.
Fabric for the inner pocket (optional), 2 pieces measuring 7 × 8½”
I suggest quilting cotton for the pockets, plus this is a great opportunity to use up some scraps! You can also follow my lead and match your pocket to your handles.
Decor weight interfacing, 2 pieces measuring about 22 x 26” (or 1 yard)
I used Pellon 809 Decor Bond Heavy Fusible Interfacing, but Pellon 808 Craft Fuse (often sold at Michael’s) will work too. It’s ok if you can’t buy these by the yard like I did, you can easily overlap smaller strips!
Mid-weight fusible interfacing
For straps: 2x strips measuring 4 × 42½”
I buy mid-weight fusible interfacing by the roll, so cutting long strips is easy! If you don’t have a roll, feel free to cut 4” strips and iron then on separately with a slight ¼” overlap of each piece.
For the pocket: 1 piece measuring 6 ½ x 8”
Batting scraps, 2 pieces measuring 26 × 32”
I used longarm scraps that I fused together with Heat Press Batting Together - it’s my favorite method for bag projects! Since the Decor Bond interfacing will keep the bag stiff and you’ll be quilting the heart panels, the batting can be a bit scrappy.
3 yard of ½” double fold bias tape
You can make your own bias binding (and more power to you, you overachiever!), just make sure it’s at least 2¼ - 2½“. I’ll be showing how to attach pressed double fold bias tape, but you can attach it however you like!
Thread for quilting
My current quilting favorites: Superior Threads’ Magnifico/Fantastico for a glossy look, Aurifil’s Mako Cotton for a thicker, visible look, and Superior Threads’ OMNI for a matte look (it comes in 160+ colors and is my #1 longarm thread!).
Heart Template
Download the template here.
Basic sewing supplies
Iron
Spray bottle with water
Pressing cloth
Basting Spray/Glue
Fabric Scissors
Piecing thread
Marking or pressing tool
I love the Chaco Pens for visible marking (for example, marking around the template).
I prefer to use the Clover Point 2 Point tool for marking quilting lines. I have a tutorial below on how I use it!
This tutorial will be laid out step-by-step with photos to help you along your way. If you aren’t a photo tutorial person, you can buy the pattern in my shop or check out my Youtube page in a few weeks - I’ll update here once my video tutorial is done!
Alright, grab all your supplies and let’s sew, friends!
1. Cut out your heart template
Print out the template sheets and tape the pages together. Here’s what the print-at-home page layout should look like:
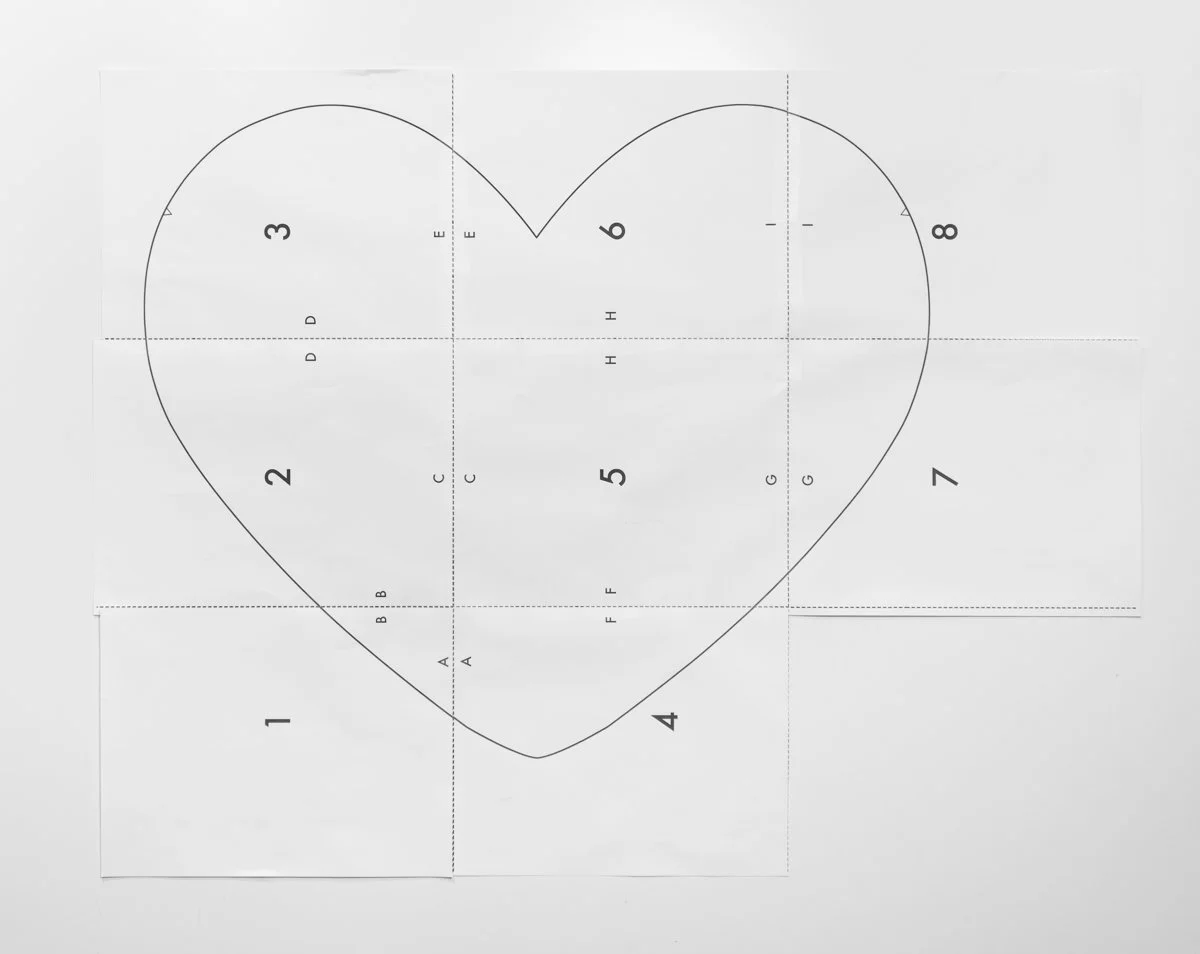
Cut around the edge of the heart shape. If you plan to use this template more than once, it’s worth gluing the paper to poster board and cutting it out with thicker paper.
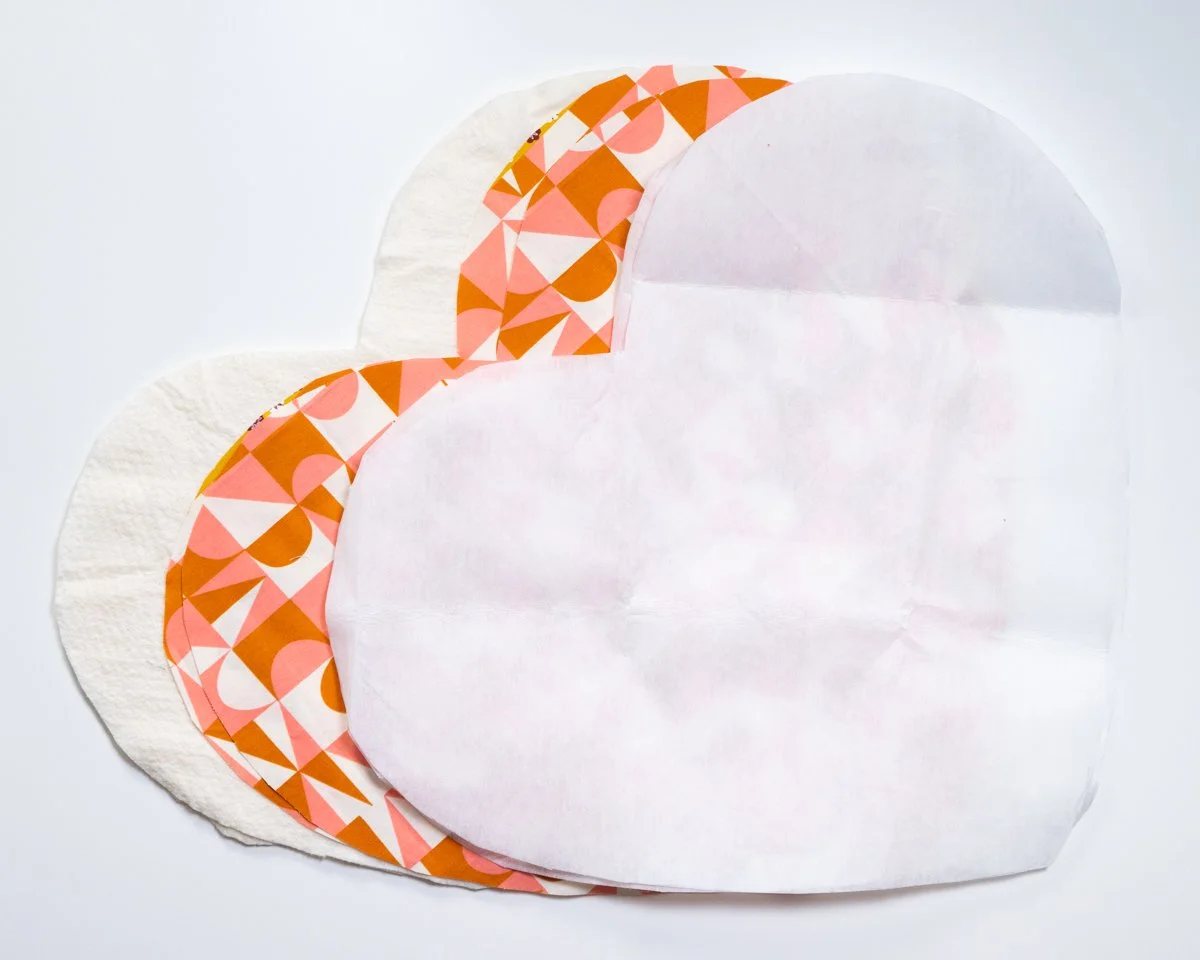
2. Use your heart template to cut out your outer fabric, interfacing and batting pieces. (Note: do NOT cut out your lining fabric yet!)
This template is big and cutting out the pieces economically is a bit tricky. To help explain how I cut out the pieces for the outer fabric, I’ve created a diagram to help:
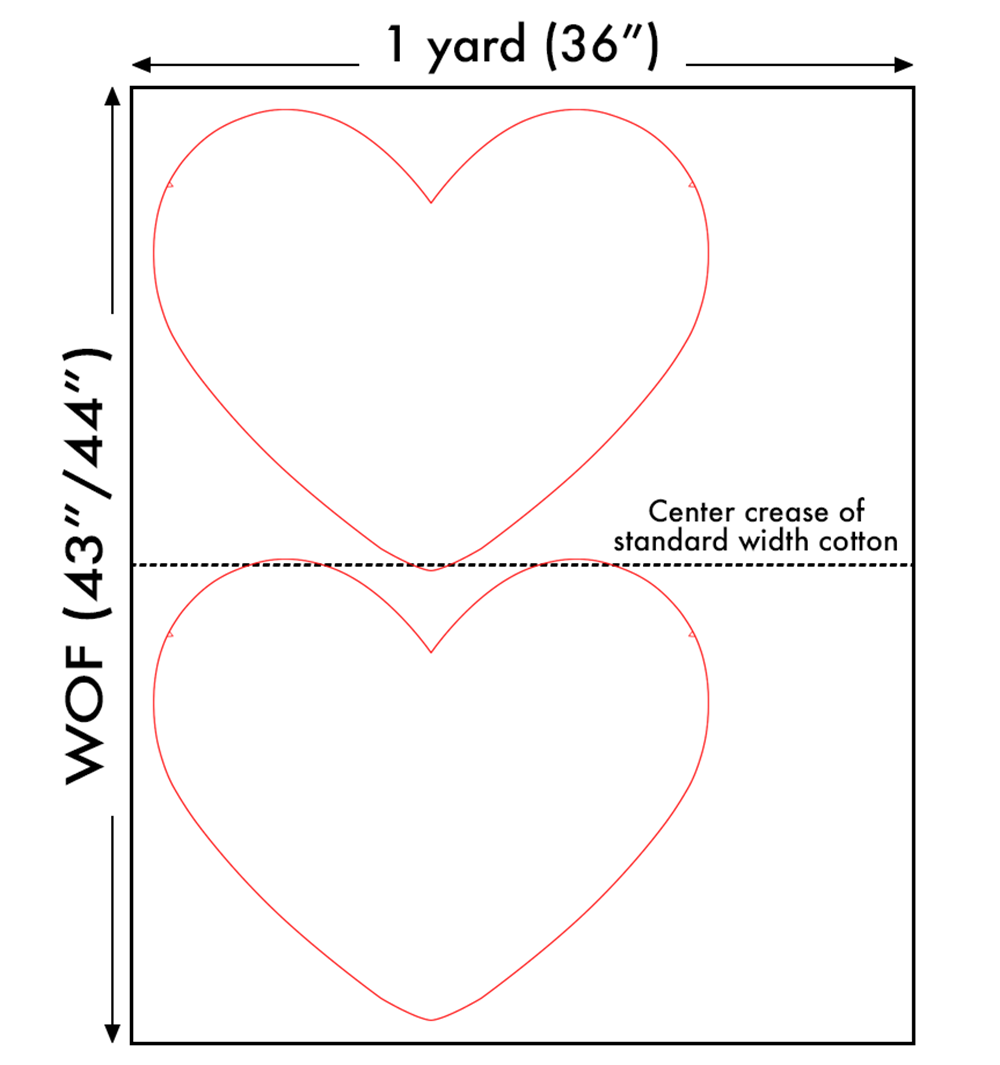
The red line is where the template would be cut out, which you’ll notice is just over half of the WOF (width of fabric). Rather than cutting both pieces at once, open your fabric from its standard half WOF fold and cut your pieces individually.
Draw about 1 inch around the template and cut out your pieces. This does not need to be exact - the extra room around the template is for the natural shrinking that happens when you quilt your pieces and will be trimmed down once quilting is done.
Your marking tool won’t show once your final heart template is cut out, so use whatever you have!
Repeat this process with your outside fabric, interfacing and batting pieces. You should have 2 lining pieces, 2 outside pieces, 2 interfacing pieces and 2 batting pieces.
3. Attach the Decor Bond interfacing to the lining.
If you’re an interfacing pro, follow the manufacturer’s instructions and keep living your best life. If you’ve never attached fusible interfacing, especially pieces this large, follow along with the photos below!
Start by laying out the lining fabric, wrong side up, on your ironing board. (Remember, we didn’t cut the lining fabric, so it should be a full yard of fabric.)
Place one interfacing heart, shiny side down, on top of your lining fabric. Make sure it’s as close to the selvedge as possible - a little overlap is ok! Remember, you cut an inch around your template that will be trimmed down after quilting.

The reason you don’t cut your lining fabric beforehand is to avoid interfacing mishaps, like adhering it to your ironing board (hi, I’m the problem, I’ve done this like 50 times). This method creates a cleaner finish with more wiggle room!
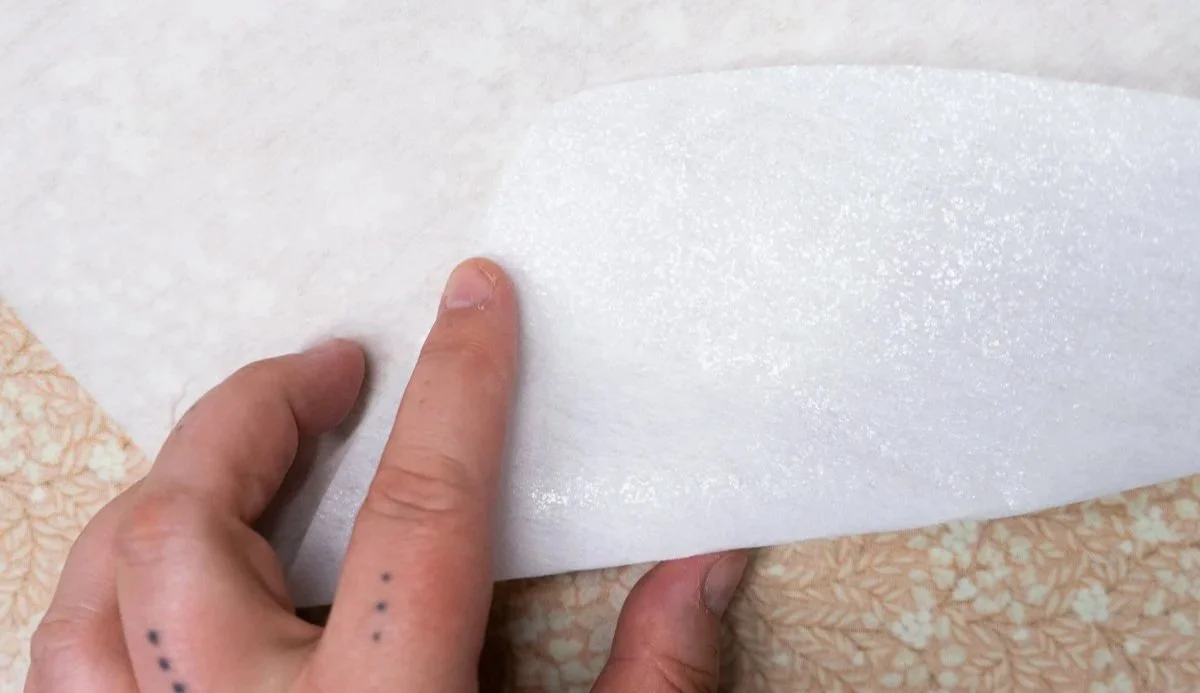
The shiny side should be face down on the wrong side of the lining fabric, which you can see here. It’s tough to show in photos, but you should notice that when you wiggle around the interfacing, one side catches the light - that’s your shiny side! The opposite side will be matte.
Take a pressing cloth - I use a piece of lightly colored quilting cotton - and place it over the interfacing. It’s ok if the cloth isn’t as big as your panel, just make sure it covers the middle of the heart at the start.
Mist your pressing cloth with water so it’s damp, but not soaked.
Making sure your iron is set to medium-high heat (usually right below the cotton setting on modern irons), press down in the center of your heart template. Leave your iron stationary for 10-15 seconds.

Lift your iron up for a moment, then press down on a spot adjacent to where you just pressed. You’re going to press from the center out until the interfacing is completely adhered.
You will need to spray as you go and move your pressing cloth if it’s not big enough to cover the entire heart piece. Just make sure that the spot you’re pressing is damp before setting down your iron.
Repeat this process until you’ve adhered the fusible interfacing to your lining fabric. Repeat the process for the second panel.
My biggest issue with this interfacing is that it can be tricky to adhere, so I highly recommend pressing for the full 15 seconds. I also found that if my pressing cloth isn’t damp enough, it won’t adhere, so keep your spray bottle handy. Don’t worry if it takes a second pass - it’s worth the extra time to make sure that fusible is truly fused!
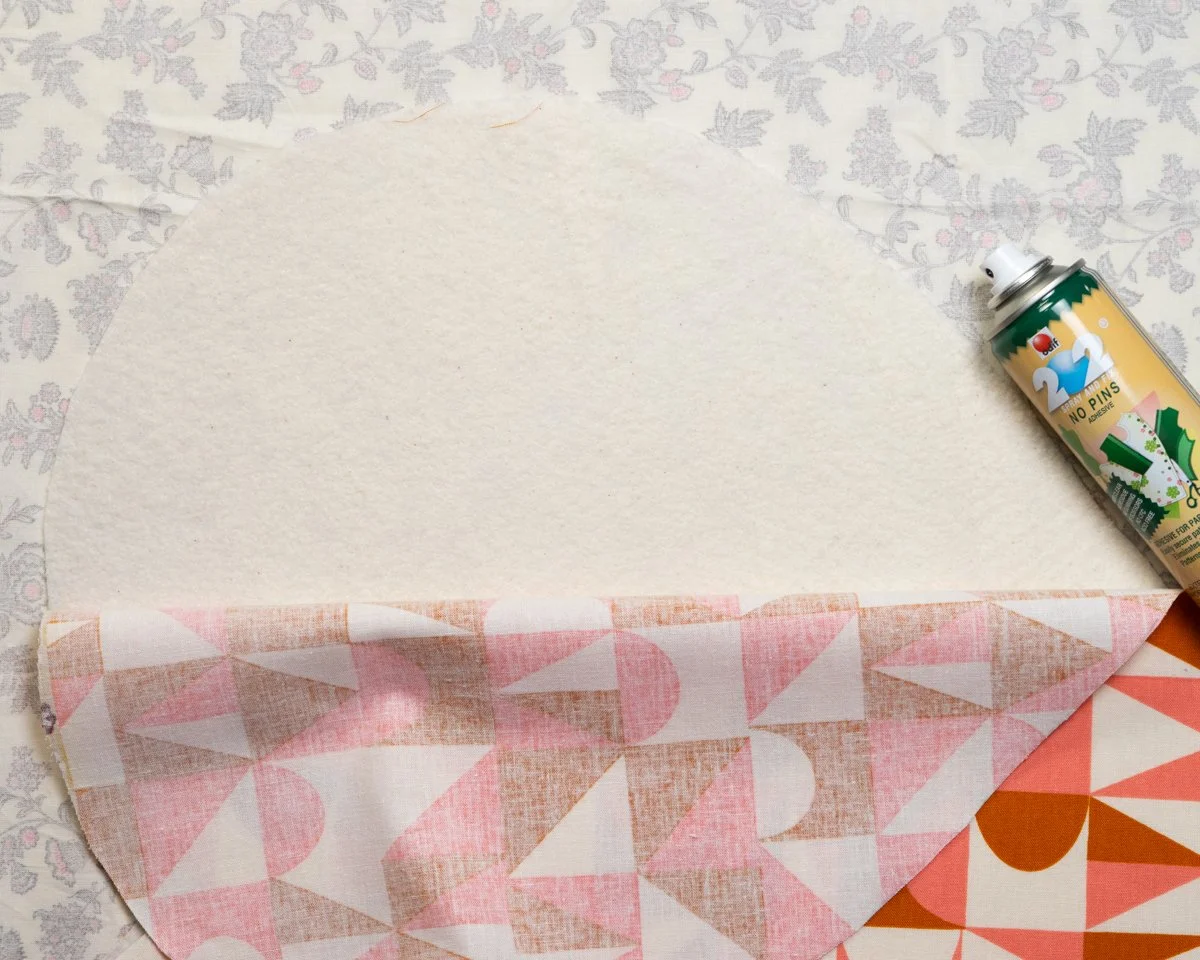
Once your 2 interfacing hearts are fused to your lining fabric, cut around the interfacing. You now have 2 lining pieces with interfacing attached!
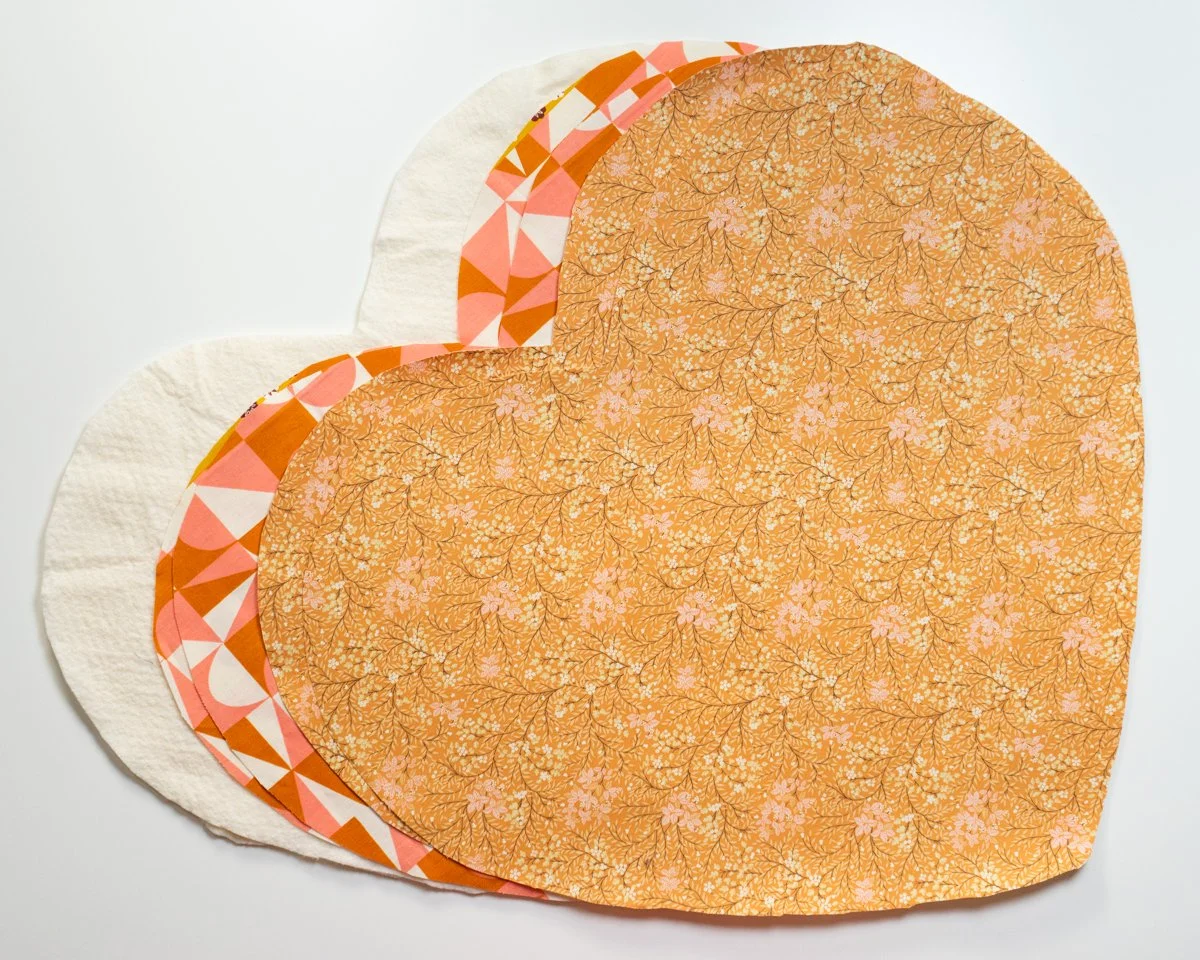
You should now have 2 batting pieces, 2 outer fabric pieces, and 2 lining/interfacing pieces.
4. Create your quilt sandwiches.
Note: basting spray is important for this step, as the heavy weight fusible interfacing is quite stiff, making it tough to pin baste. If you want to use pins, I recommend some sort of glue to help keep the pieces in place as you pin or those lining pieces will be sliding all over the place.
Start by laying a batting piece on a flat surface. Lay an outer fabric pieces on top of the batting, lining up the edges of the heart (don’t worry if it’s not perfect). Lift up half of the outer fabric to reveal the batting underneath:
I like to put a spare piece of fabric under the batting to avoid getting basting spray on my table. Old sheets work well!
Spray the batting with basting spray, then lay back down the outer fabric on top. Press firmly, working out any bubbles/folds if they appear - you can lift it back up quickly if you need to re-position the outer fabric!
Repeat this process for the other half of the batting/outer fabric.
Flip your batting piece over so the outer fabric is now face down and the remaining batting side is face up. Place the lining/interfacing on top, interfacing side down. Lift up half of the lining, spray the batting with basting spray, then immediately press it back down. Repeat for the other half of the batting/lining fabric.
Repeat this process for your second panel.
5. Quilt and cut out your heart panels.
Use your imagination and have fun with your quilting - remember, this is supposed to be fun! It’s just a bag and no one will care if your quilting isn’t perfect, I promise.
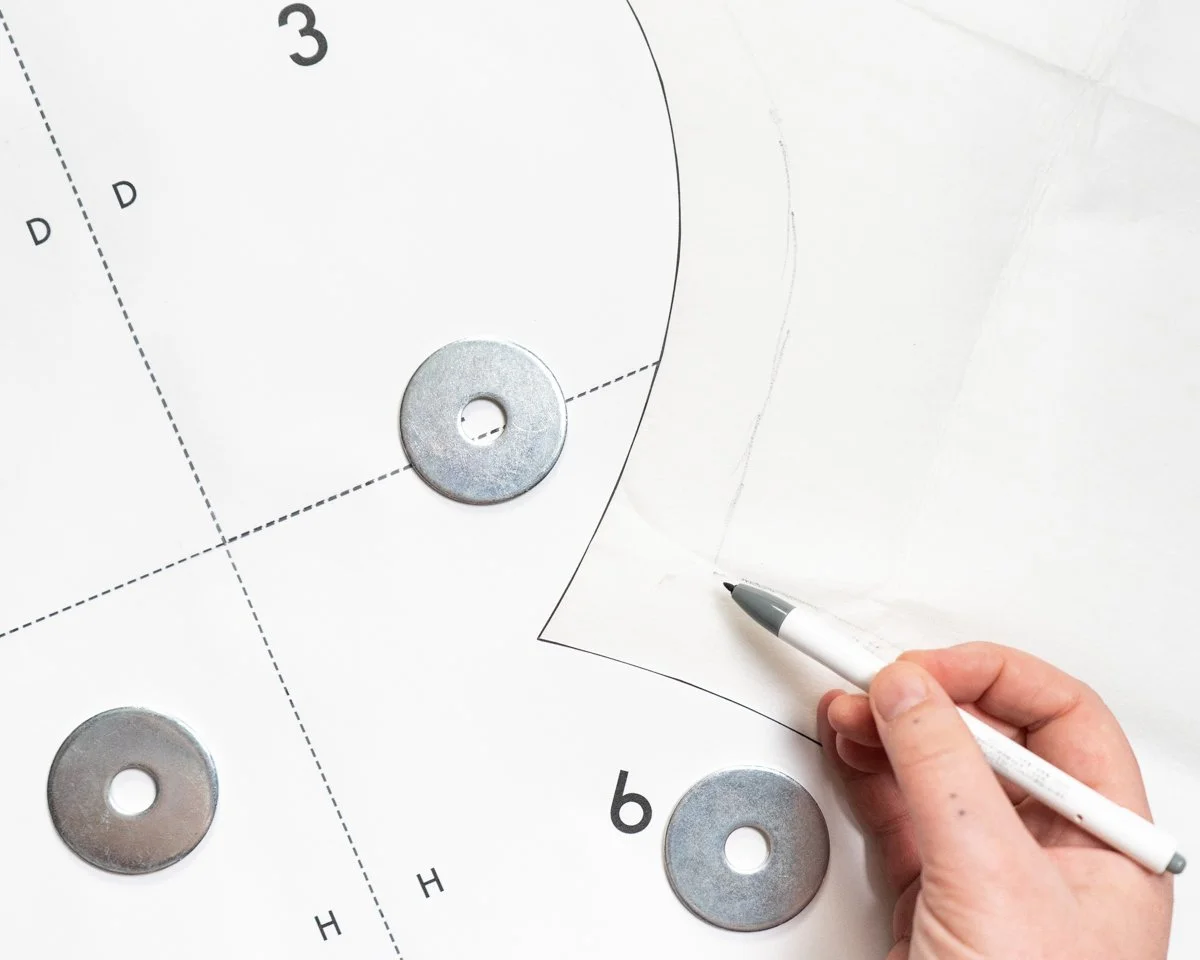
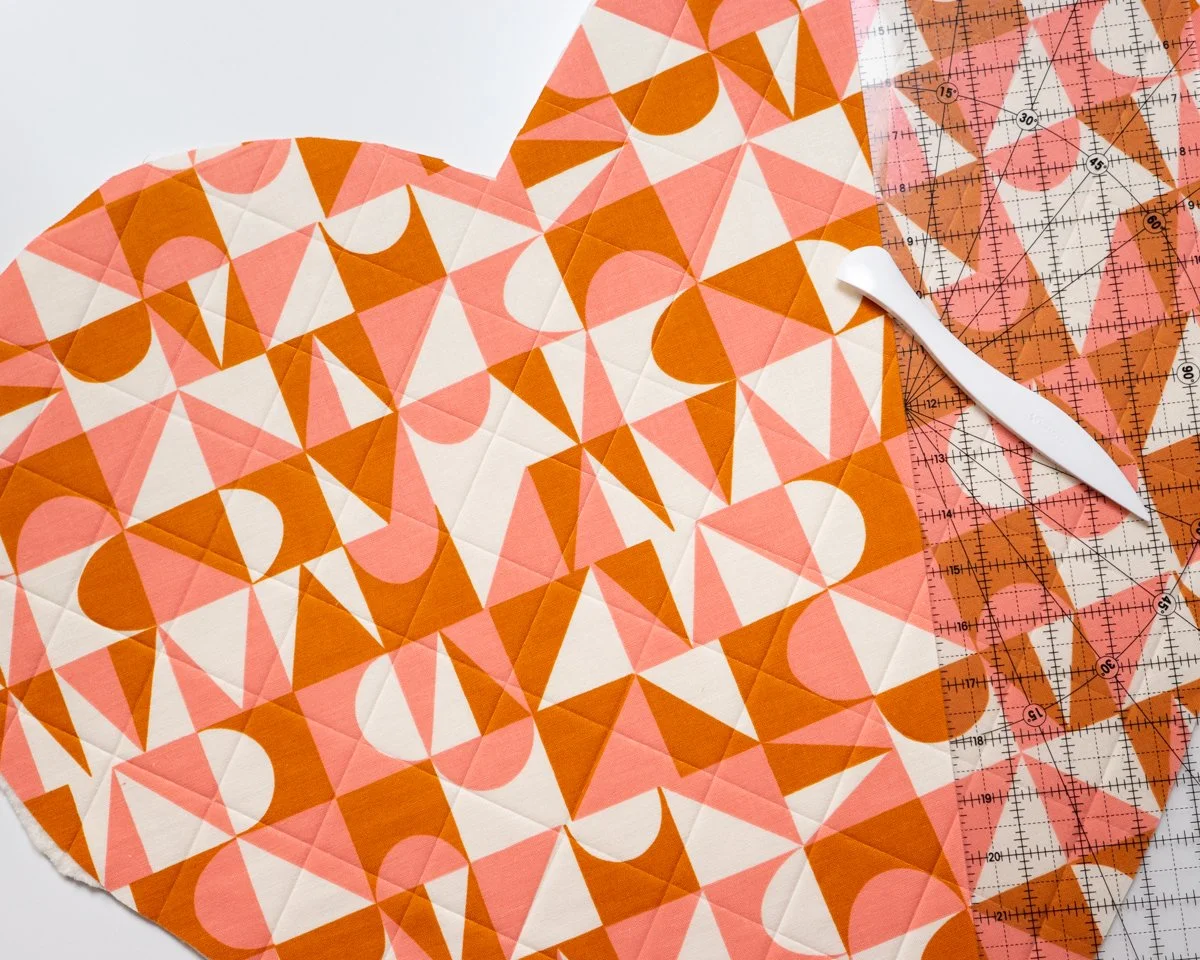
Once you’re done quilting, lay down your heart template on your quilted panels and mark around it. Cut out your 2 quilted panels. Mark the two opening points (represented as little triangles on your heart template) - they’ll be covered with binding later, so don’t worry about using a removable market. You should have 2 heart shaped panels!
If you’ve never quilted a panel like this, here are some tips to help you get started:
I love the Point 2 Point Turner from Clover for visible marks that you won’t need to erase later. I choose a design, then I use the large, creased edge of the turner to press down my lines. Take a look at the photos below to see how it works:
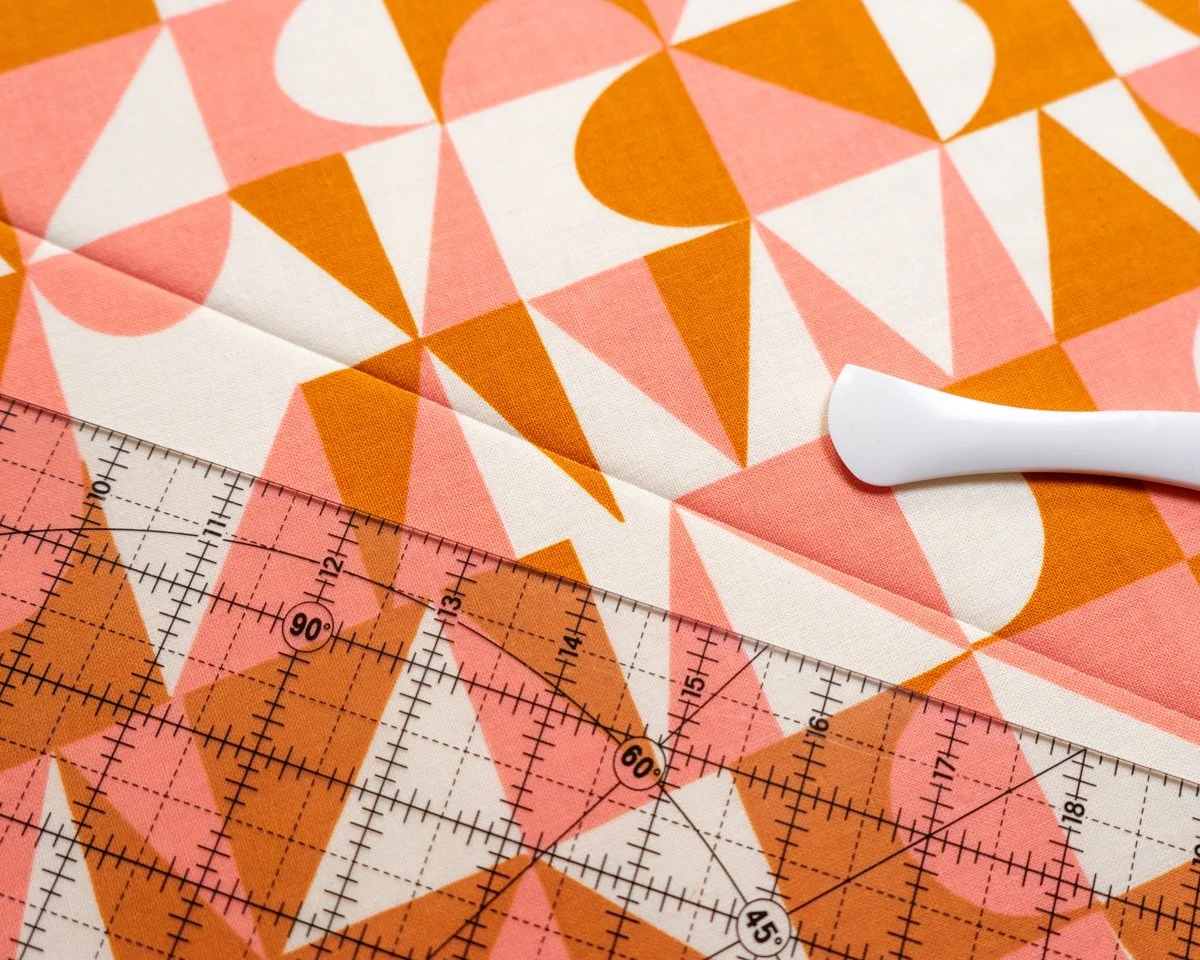
I lay down a ruler on top of my panel, then press down the P2P Turner along the ruler’s edge. Make sure to press firmly to create a creased line, like you can see above. I suggest marking parallel lines 2” apart or less.
To create a grid, use the marks on your ruler - I’m lining up the 12½” mark along a creased line to create a perpendicular line. You can also use those 60º, 45º, and 30º diagonal lines to create a different type of grid. Keep scrolling for an example of what that would look like!
I recommend quilting in one direction to avoid directional puckering lines. If you sew down one side, then turn the bag and sew down a parallel line, you can sometimes create angled puckering lines. Even though it requires more time, I recommend sewing a line in one direction, pulling the panel out of the machine, then repositioning it back at your machine starting at the same side your previously started at. It’s hard to type that out clearly, so I drew a diagram below to help explain what I mean:
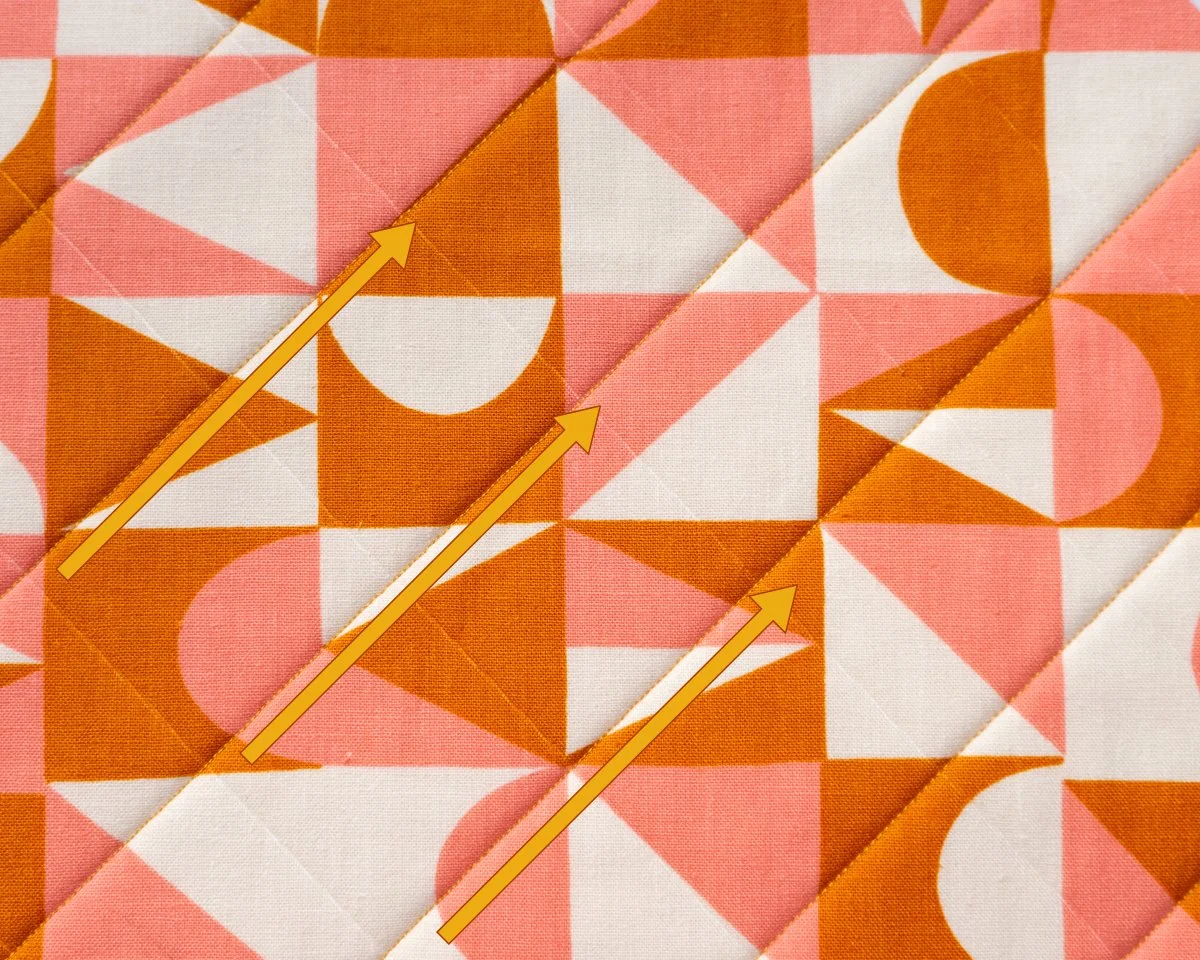
Sew in the direction of the yellow arrows.
Simple crosshatch quilting is easy and requires little thought, but looks clean and polished - it’s perfect for this bag. It’s what I used for this tutorial sample and I placed my lines about 2” apart. Here’s what the grid looks like before quilting:
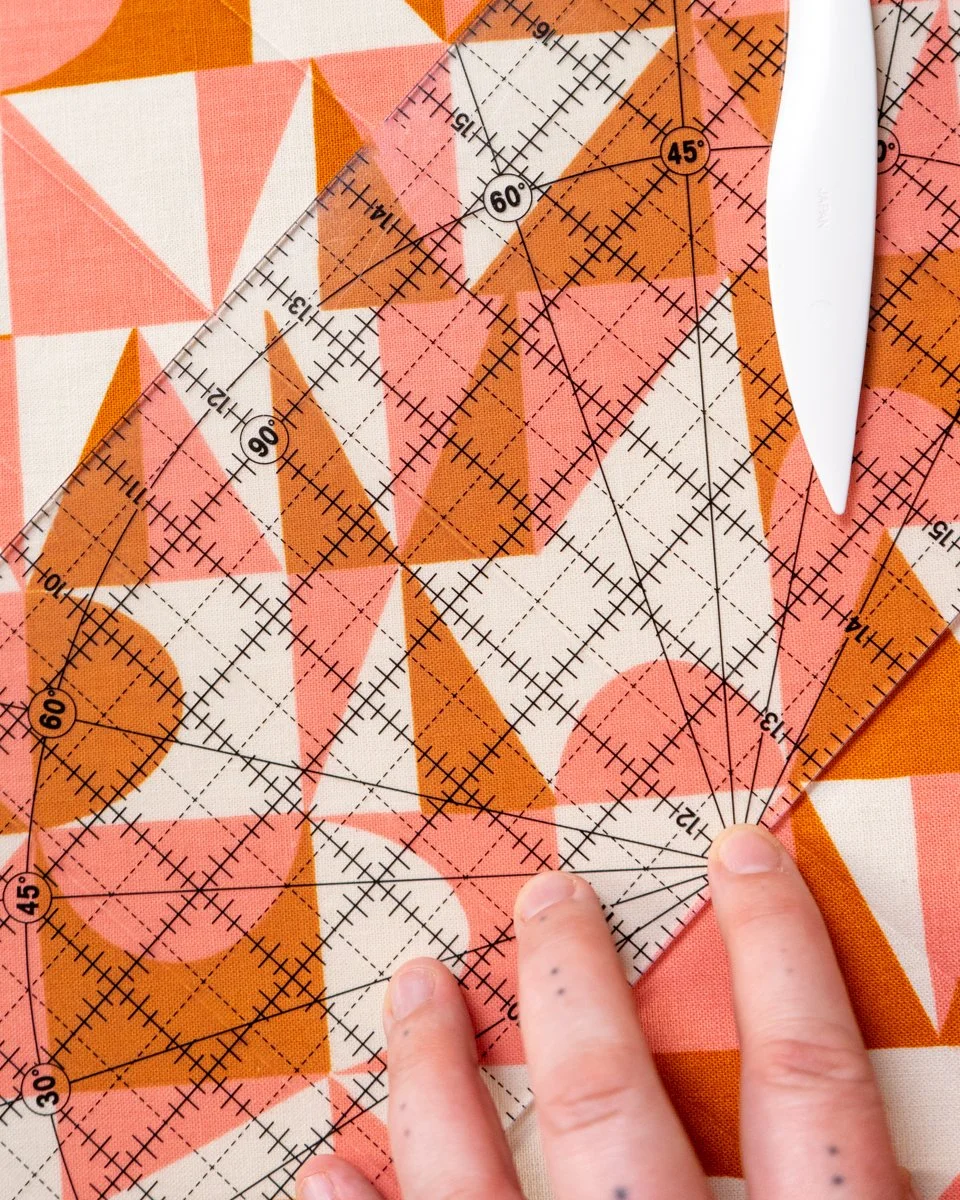
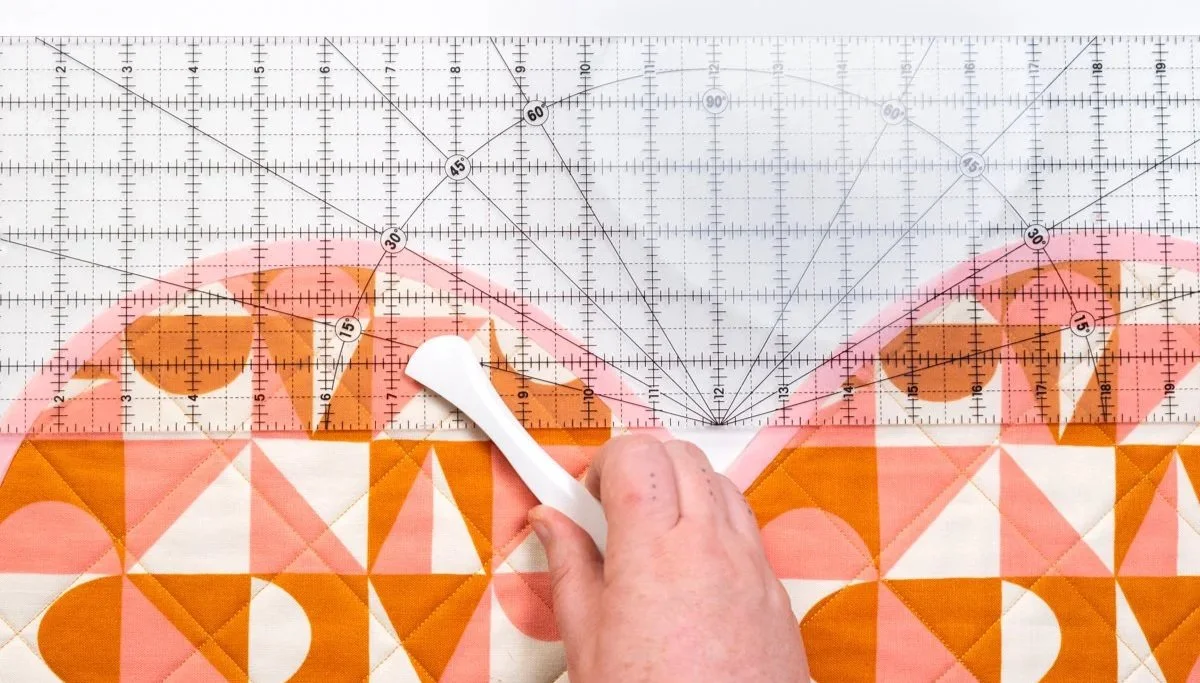
A lot of 6” x 24” rulers have angled lines on them and this is the perfect opportunity to use them! I like to mark one diagonal direction of lines first, then I use my ruler’s angled lines to mark the intersecting lines. Take a look below for a visual description:
I marked lines 2” apart along one side, then used the 30º angled line on my ruler to mark the intersecting lines. I love the diamond shape it creates here!
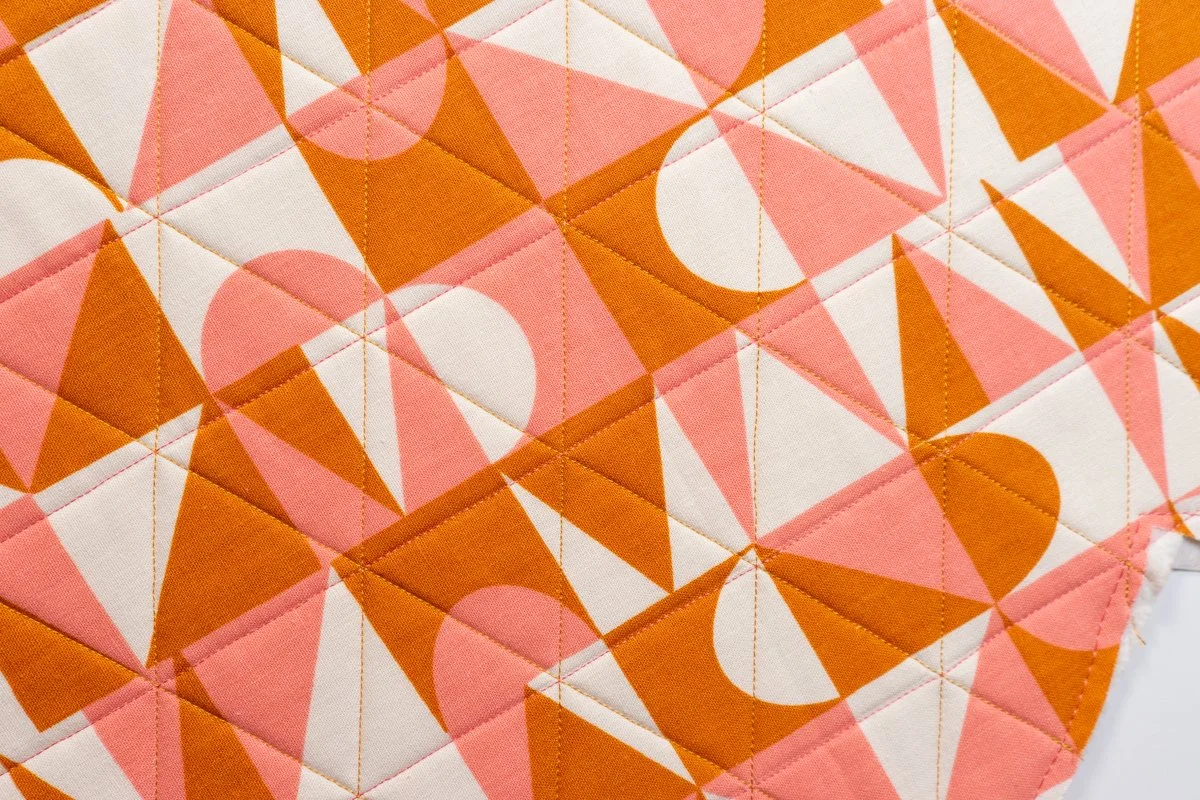
This is the quilted panel seen above, but you’ll notice that I added a second color of thread with lines that intersect the center of the diamonds. It creates some fun dimension!
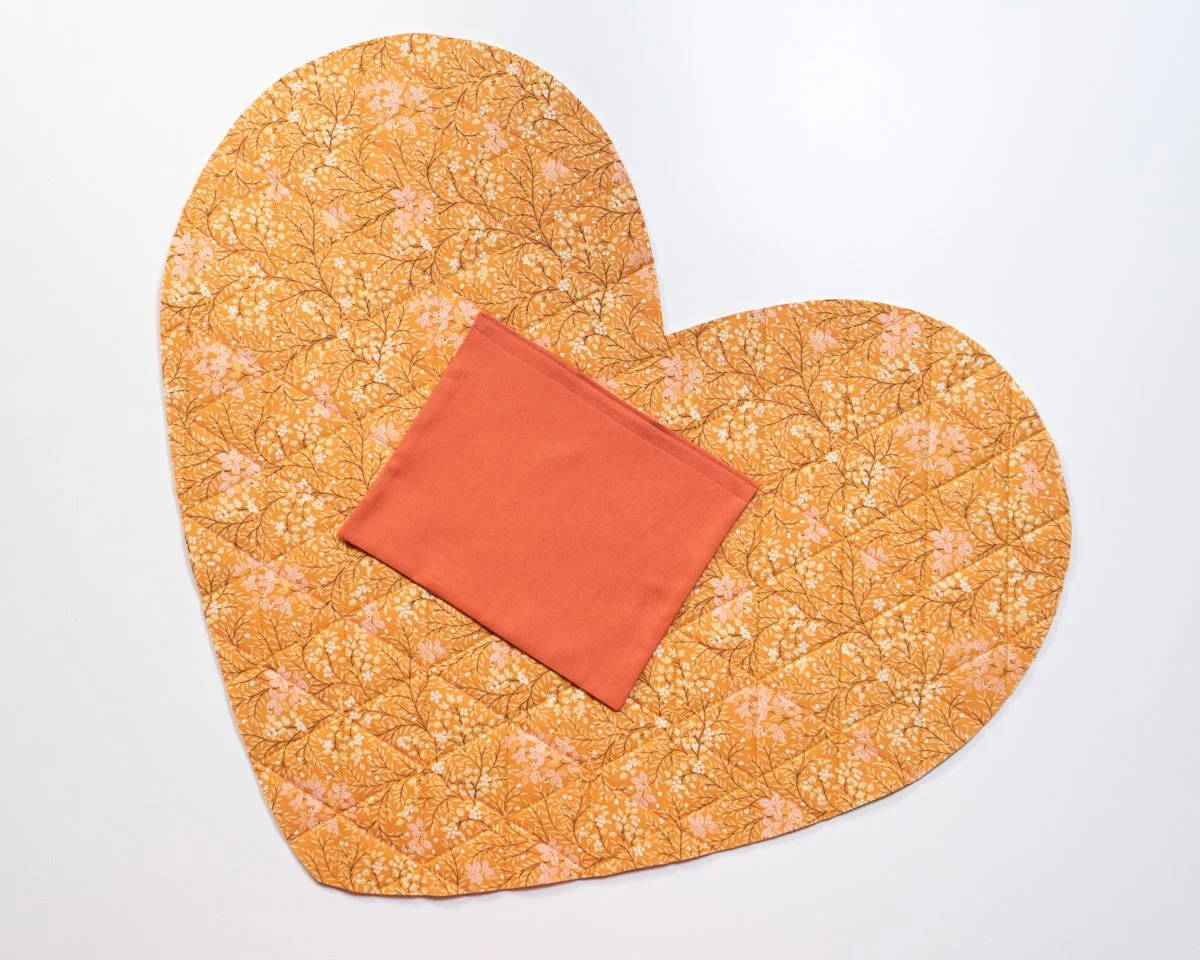
6. Create and attach your pocket (optional).
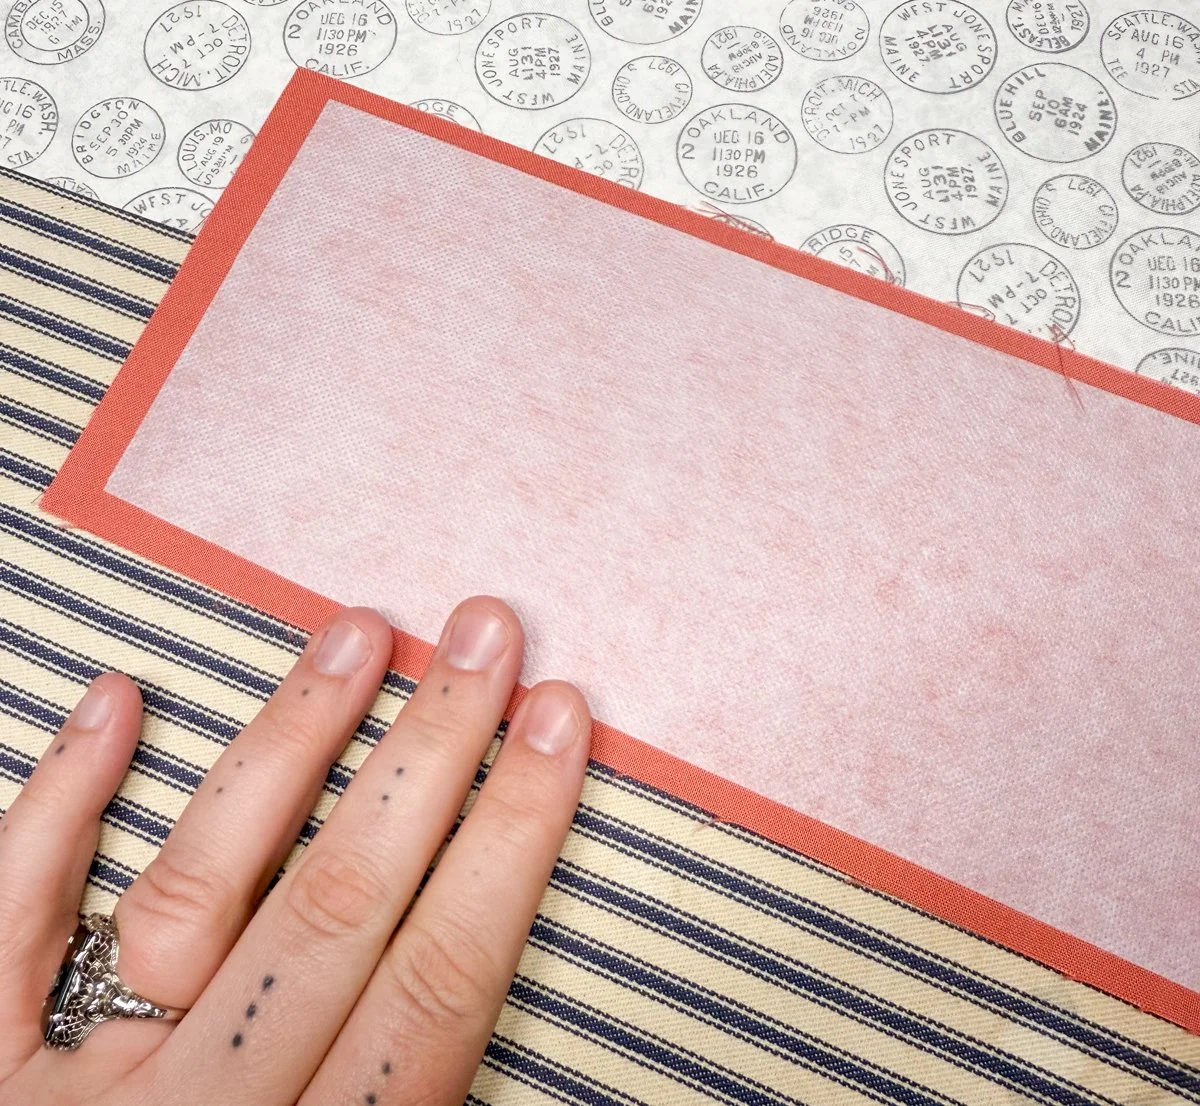
Start by attaching your interfacing to the wrong side of one pocket piece. It will be ½” smaller than your pocket pieces, so try to center it as best your can - you should have about ¼” of fabric visible on every side.
Note: If you have an outer pocket fabric and a lining pocket fabric, it truly does not matter which you attach the interfacing to, I promise. I’ve tried it both ways and find it makes little to no difference.
Use the method from the previous interfacing step: place the interfacing shiny side down on the wrong side of the pocket, cover it with a pressing cloth, spray the cloth damp, then press firmly for 10-15 seconds. Repeat until the entire pocket interfacing is attached.

I mis-cut my interfacing and made it the same size as the pocket pieces. It’s totally ok - cutting the interfacing smaller helps make the seams cleaner and lay flatter. Just a reminder than these types of mistakes are ok and your bag will still be amazing!
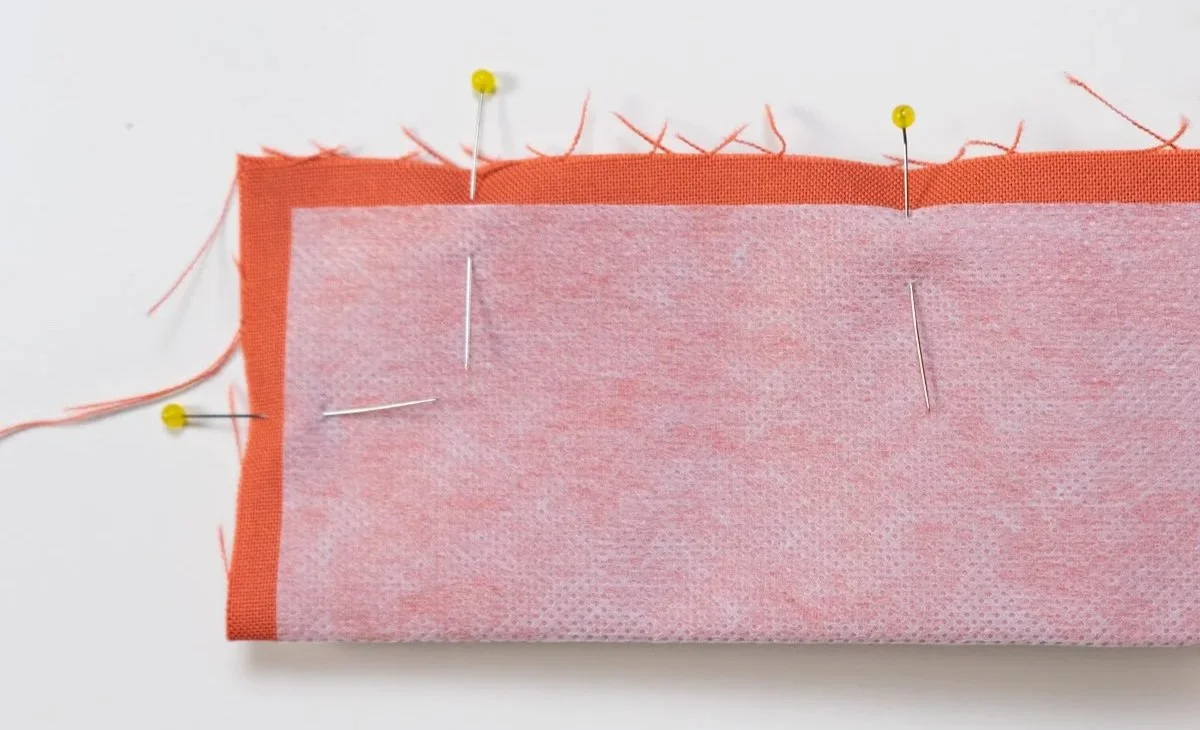
Take your two pocket pieces and place them right sides together (one should have the interfacing facing out). Sew ¼” around the edges of the rectangle, leaving a 2-3” opening along the bottom:
Trim the corners to reduce bulk when you turn it right side out:
The left is a cut corner, the right shows a marked line where I suggest cutting. You’ll notice it’s slightly angled out, not a straight line - I’ve found this creates a cleaner corner!
Turn the pocket panel right sides out, using a point turner to push out the corners. Iron the panel and press your opening seam allowance to ¼”.
Note: If you’ve never done this, it’s a bit awkward and takes some practice to get right. You want to fold the fabric INWARDS a ¼” and iron it down carefully. This is another reason why cutting your interfacing ½” smaller than your pocket panel is so useful - it acts like a guide for ironing down your seam allowance!
Pin your opening closed, then sew an ⅛” seam along the entire edge where the opening is, not just the 2-3” opening. This creates a nice, finished line for the top of your pocket. If you’re fancy like me, sew another line ¼” away from that ⅛” seam for a sophisticated pocket. (This is optional, I just think it makes the pocket looks really classy!)
Here’s what a fancy pocket finish looks like!
Place your pocket on the lining side of one panel. I intentionally didn’t create a guide for where to place your pocket, because everyone has an opinion about pockets - “but I like my pockets off to the side” or “why would you place a pocket to the side, I want mine in the middle.” This is a choose your own adventure for pocket placement, just make sure it’s about 1” away from any edge and don’t place it too far up into the curved heart tops or you’ll run into issues attaching the straps. Below is where I placed my pocket:
Sew around the sides and bottom of the pocket panel, avoiding the top, using a ⅛” seam allowance. Backtrack at the start and end of sewing to ensure your pocket stays put as you use it.
If you’re like me and appreciate a special pocket for your pens, sew a vertical line about 2” from one side of the pocket. Backtrack at the start and end of sewing to make sure it’s sturdy!
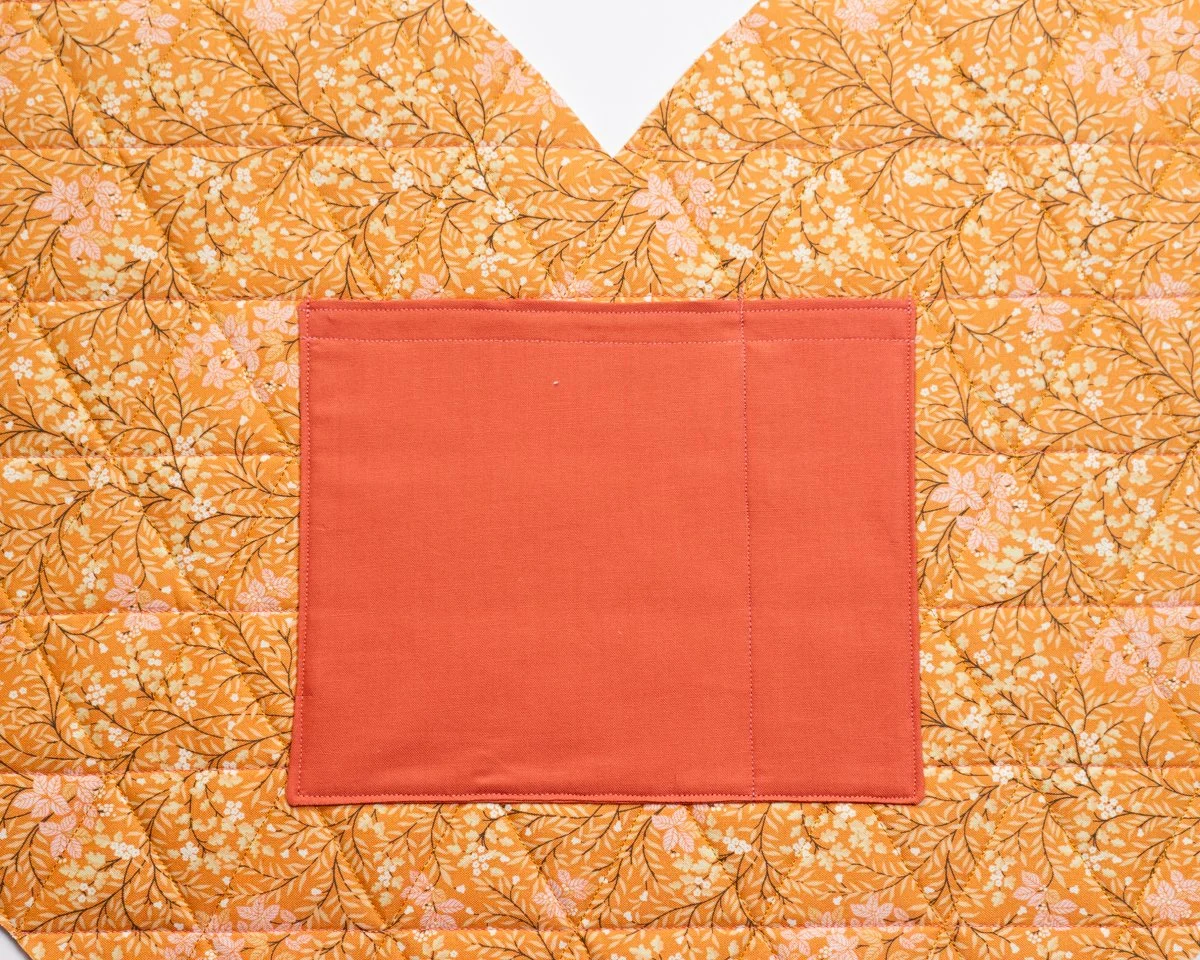
A fully tacked down pocket with a short panel on the right for my pens!
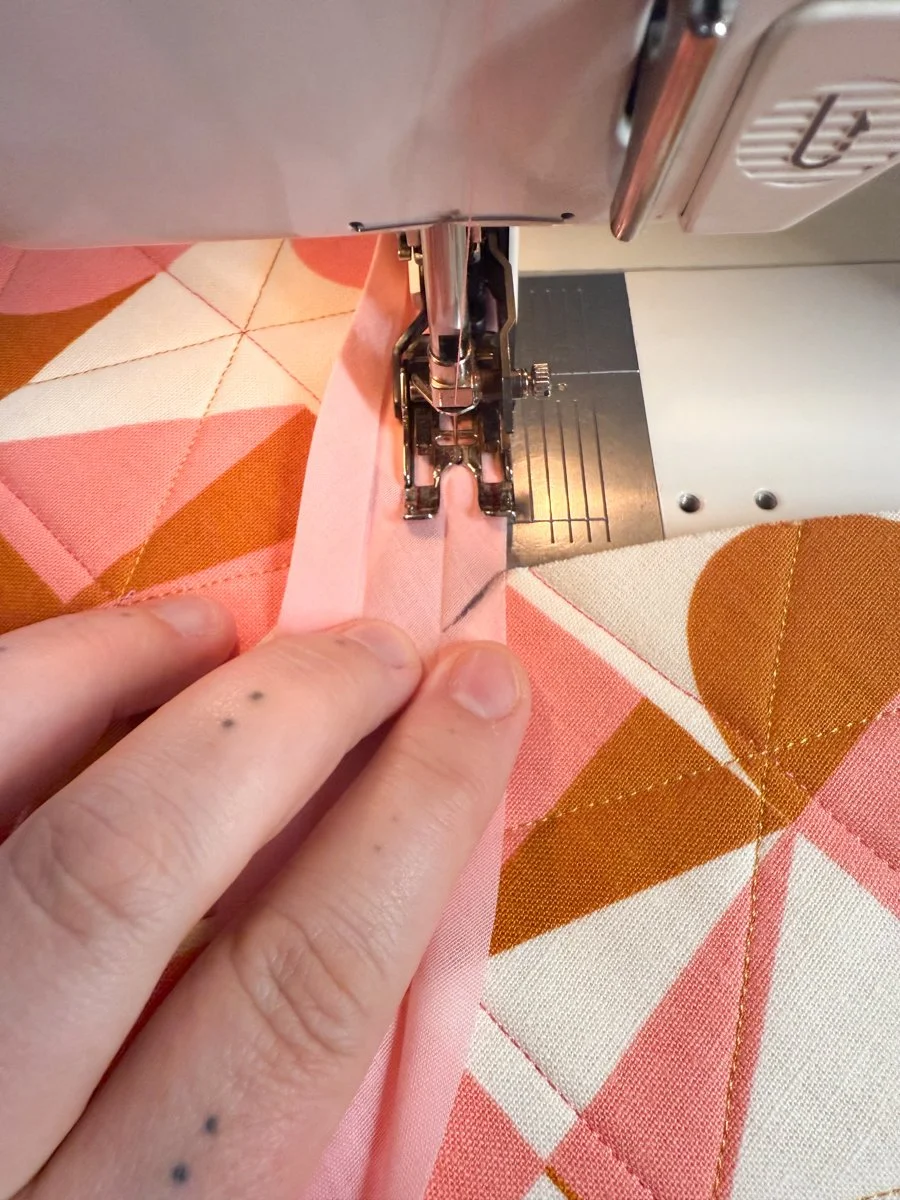
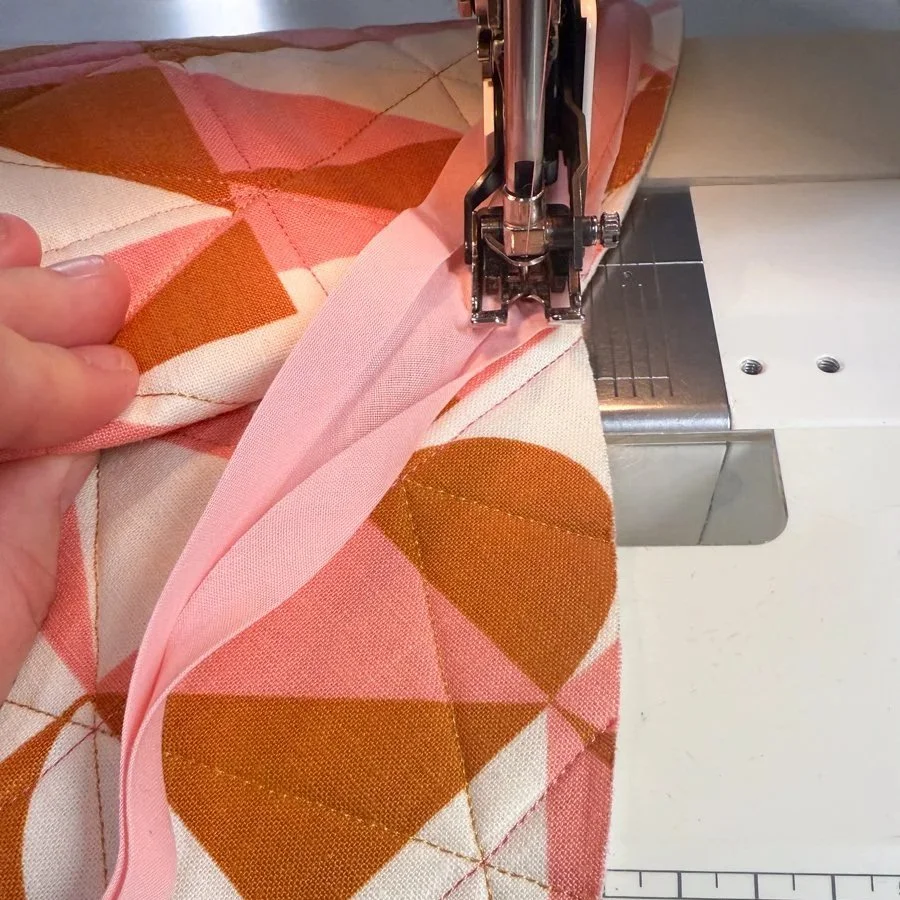
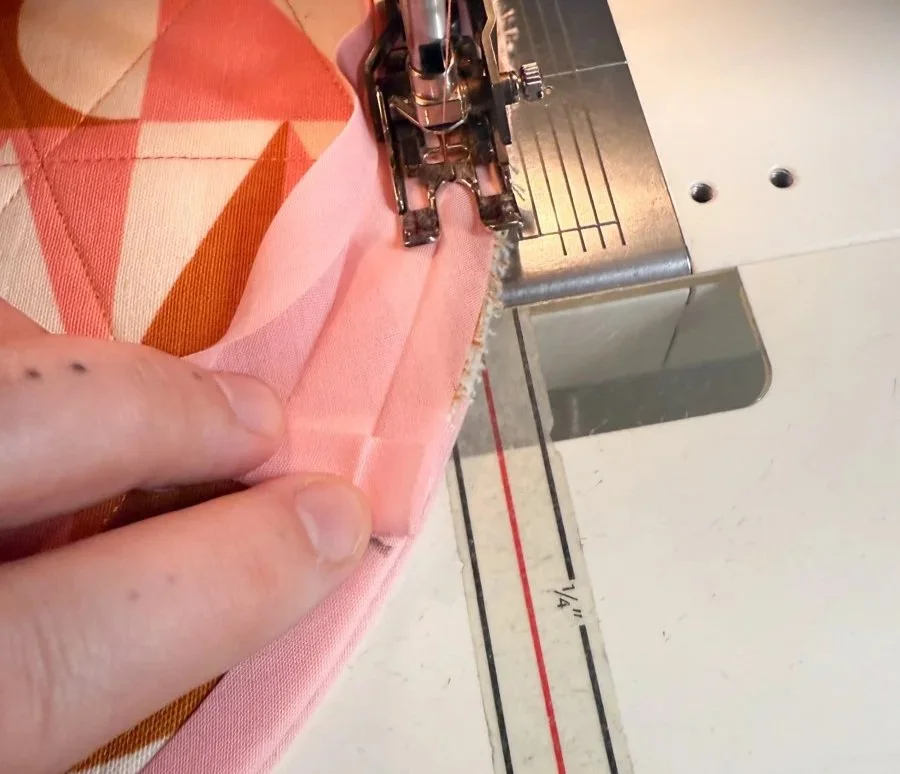
7. Attach binding to the top of the heart panels.
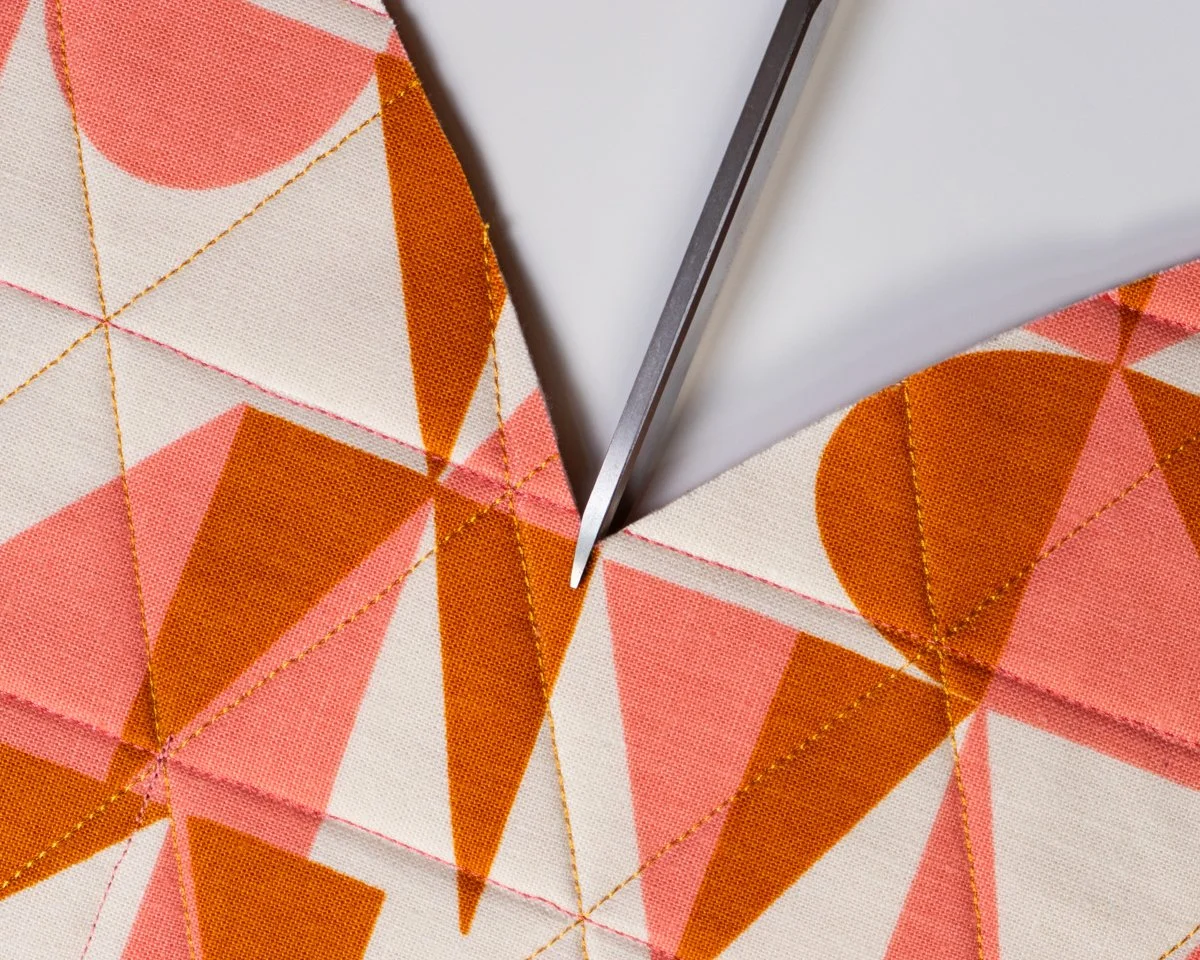
The points you marked on your heart panels are where the top binding will start and end. Start by cutting two 29” pieces of binding, one for each panel.
At the top center point of your heart, snip a little less than ¼” down through the whole quilted panel. This will help make the center dip easier to navigate later. See below:
Unfold one binding piece and place the end of it on the outside panel, placing it about ½” past your opening mark.
The yellow arrow is pointing to the opening mark. You want to have the bias tape ½” BEFORE the mark.
Start sewing along the binding’s crease, about ⅜” away from the edge. I recommend using your walking foot for this step and avoiding clips or pins - it’s best to just move the edge of the binding as you sew. Go slow and steady, there’s no rush!
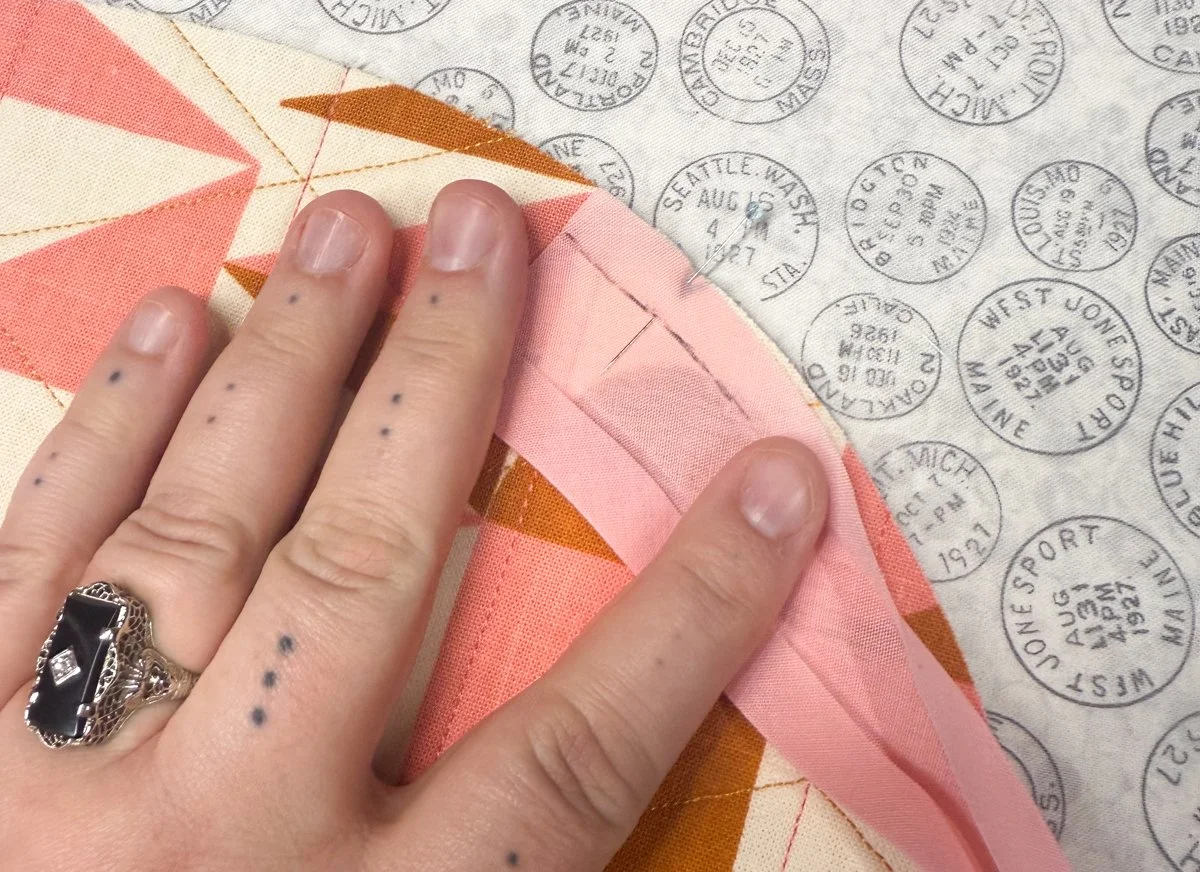
I’ve marked the crease of the bias tape here to show where you’ll be sewing. I like to pin right at the start, then just freehand the rest of the way.
The center dip is the hardest part, but the ¼” snip we made easier is designed to help. Once you get about 1” away from the center dip, lay your binding out as though you’re planning to just keep sewing downwards and mark the center of the bag on your binding.
Sew until you reach the point, leaving your needle down right in the center.
This is where that snip is going to come in handy! Lift up your machine’s foot and carefully rotate your panel until your seam line will line up with the second hump of the heart’s top. Then slowly pull down at your first hump (the one you’ve already sewn binding onto), trying to make it level with your second hump’s seam line.
(Also I’m really sorry, but “hump” was the best word I could conjur up to explain this process.)
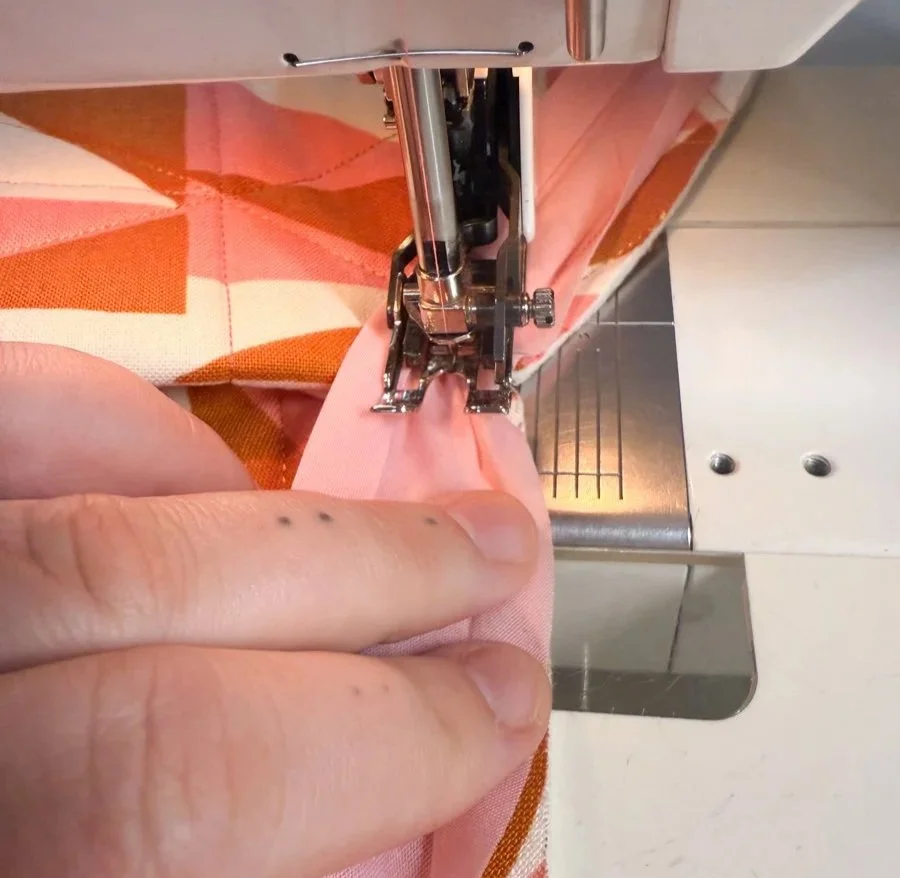
You’ll see on the left that this process creates a fold. You want to avoid stitching through that fold, so go slow. I like to sew a few stitches, then lift up my foot and adjust, making sure the fold is out of the way. The bias tape is stretchy too, so feel free to pull at it while you sew to make sure it stays in place.
Remember, fabric is maleable - you can push and pull, and make it do what you want! If you get through this process and don’t like the result, rip out to an inch before the dip and try again. Practice makes perfect.
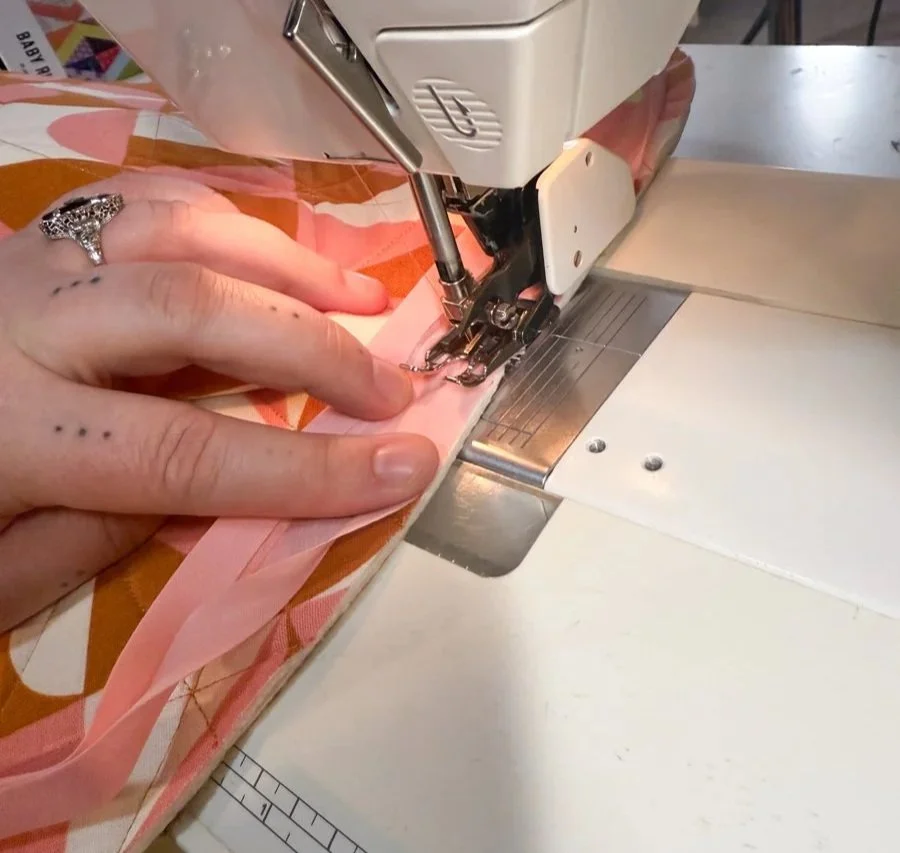
Here’s what the “pull” looks like from a different angle. You’ll notice that the two heart humps are almost in line with one another - this is the result of pulling the first hump down in line with the second.
This process can take some finagling, as you’re dealing with bulky panels and a weird angle. You’re trying to flatten the dip at the center of the heart’s top, since it’s an acute angle, making the next steps in your seam easier to sew.
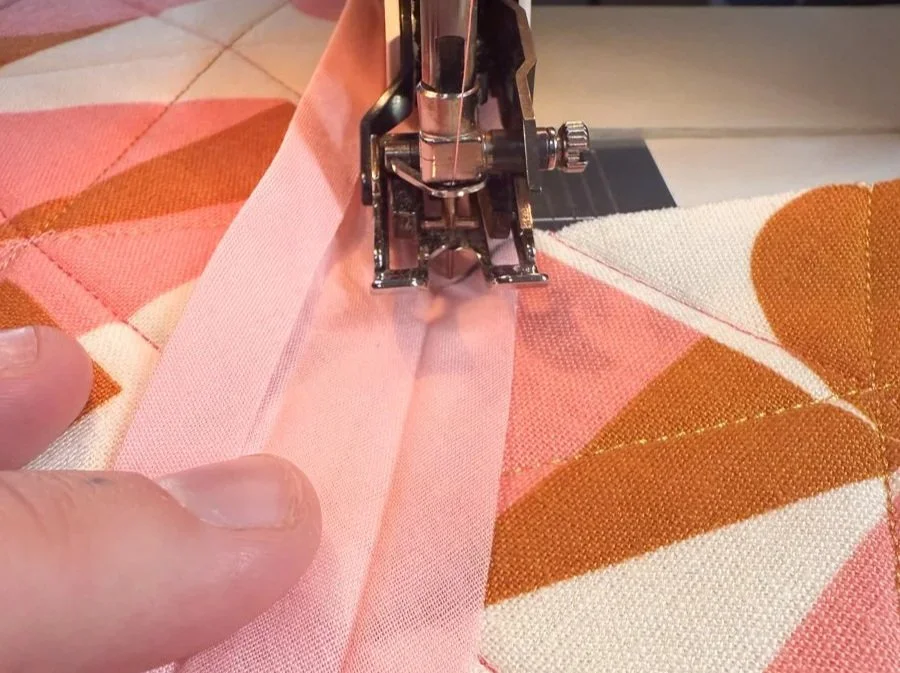
Once you’ve got a pretty flat seam, the binding should be easier to line up with the second hump. Slowly start to sew along the curve of the second hump, being careful to avoid binding folds under your needle. Once you’ve sew about an inch, you can release your panel and let it curve naturally again.
Sew the rest of your binding to ½” past the second mark on your panel. Don’t worry about tucking in any ends, these will be covered with another round of binding.
Repeat this process on the second panel.
Take your binding and fold it over the edge of your panel. You can hand sew it or machine sew it in place. Repeat this process on the second panel.
The binding flipped onto the opposite side of the panel.
Sewing the dip down is a little tedious, but only requires a little creative adjusting! Since I hand sew my binding - yes, even on bags like this - here’s a look at how I get the dip to sew down:
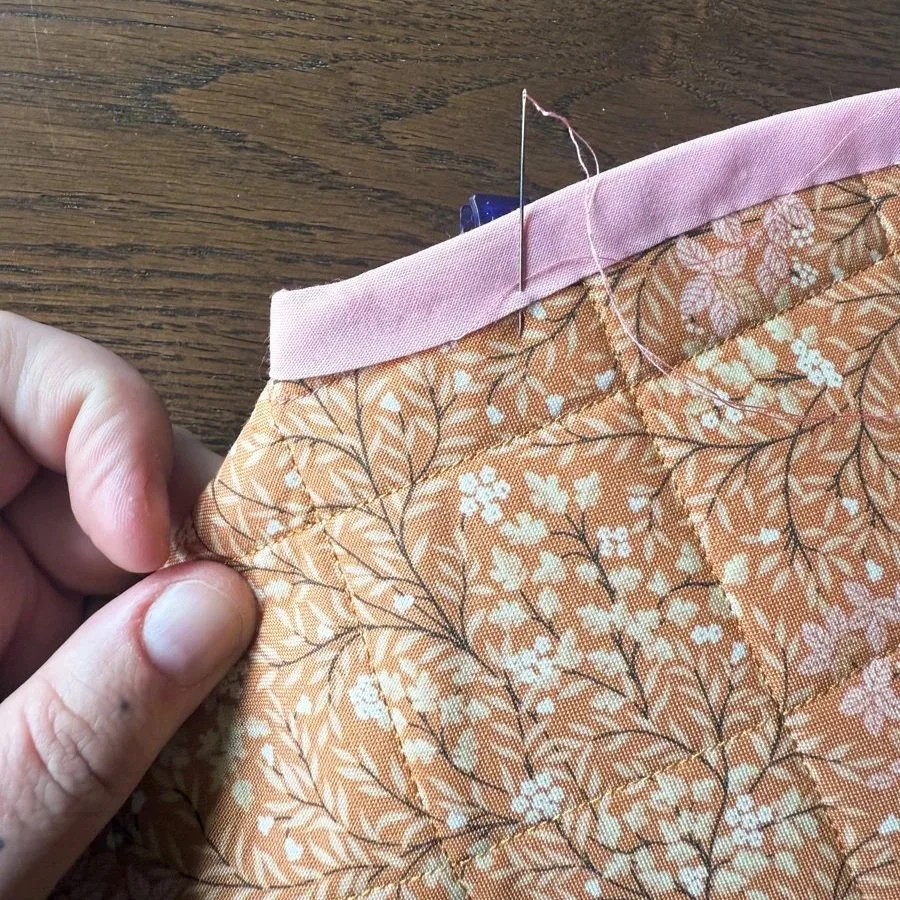
When I get about an inch away from the dip, I fold the panel in half with the hand-sewn side facing out. This usually pushes the binding out like you see above, but you can use a point turner to get it straightened out.
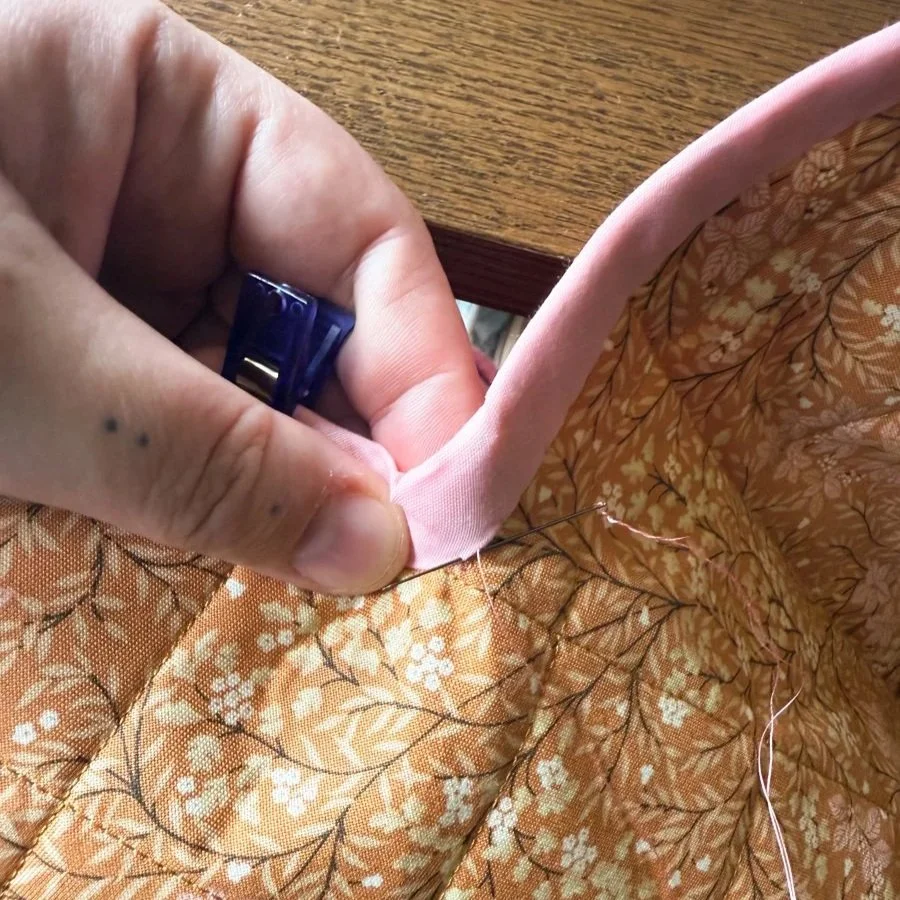
Using my thumb, I hold the binding in place at the lowest point of the dip as I sew. I like to tug the binding down with my thread to get a pointier point - again, remember that bias tape/binding is stretchy and can be pulled a bit! Once past the dip, continue to sew normally.
You should now have two panels with binding attached to just the tops. Re-mark the opening points on your binding - feel free to reuse your template if you can’t see them through the binding! This will ensure that later you’ll know where to start and end sewing your bag closed.
8. Make your straps.
You need two strips that measure 4 ½ x 43”. Check the supplies section if you have questions about this - I added some notes under the strap fabric requirement!

You’ll see a diagonal seam in my strap - that’s because my fabric was prewashing and didn’t measure 43” selvedge to selvedge.
Start by adding the mid-weight interfacing to the wrong side of your first strap. Place your fabric wrong side up on your ironing board (it might be too long for your ironing board, so start at one end of the strap). Next, place the interfacing shiny side down on top of the strap. It will be ¼” smaller on each side of the strap, so make sure it’s centered as best you can.
Here you can see that interfacing is about ¼" from each edge. It’s ok if it’s not perfect - this is a long strip, it’s hard to get it centered exactly!
Starting from one end of the strap, place a pressing cloth over the interfacing, spray it until lightly damp and press a hot iron down for 10-15 seconds. Continue lifting your iron and pressing from one side to the other, adjusting the interfacing as you go.
Repeat the process on the second strap until you have two fabric straps with interfacing on the wrong side.
Fold your strap, right sides together, along the longest side. Mark a 4-6” opening in the middle of the long side of the strap - this is where you’ll turn it inside out!
I like to pin/clip my strap seam, it’ll help keep the sides even.
Sew along all open sides (two short sides and one long side), remembering to skip the 4-6” opening on the long side. Repeat for the second strip.
Trim the corners of the strip to reduce bulk, just like you did with your pocket corners.
Turn the strips right side out using the 4-6” opening. Take your time, this process is tedious and can get frustrating! I like to use a hemostat to grip the strap end from the inside of the tube, then pull it through the opening:

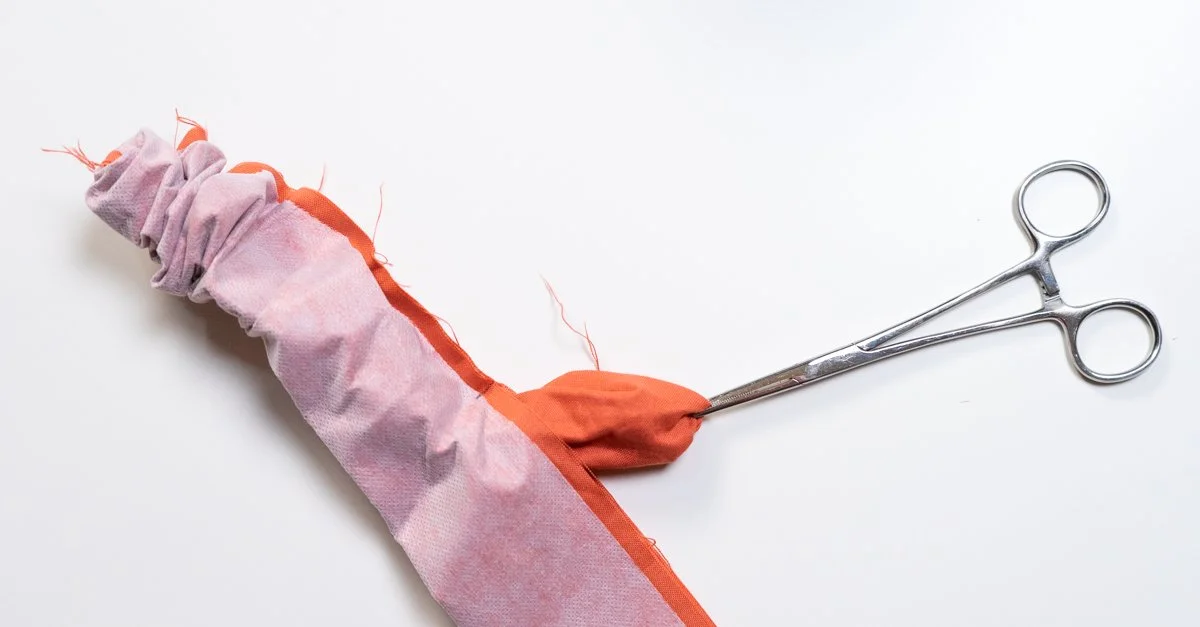
The hemostat, originally designed for clamping arteries during surgery, has a locking function that helps you firmly clamp and pull without slippage. They’re a tool I was introduced to by an expert sewist - hi Darlene! - and I use it a lot for bag making!
Press your straps flat, making sure to keep your seams flat too. Press your opening closed using a ¼” seam allowance. (Just like the pocket opening, use the interfacing as a guide for that ¼”!)
Sew around the edges of the entire strap, including the folded side, using a ⅛” seam allowance. This isn’t required, but I’ve found it makes the straps look more polished and closes the 5” opening all at the same time!
This next step is optional: I like to mark the boxed X that I’ll be sewing when I attach the straps to my bag. See below:
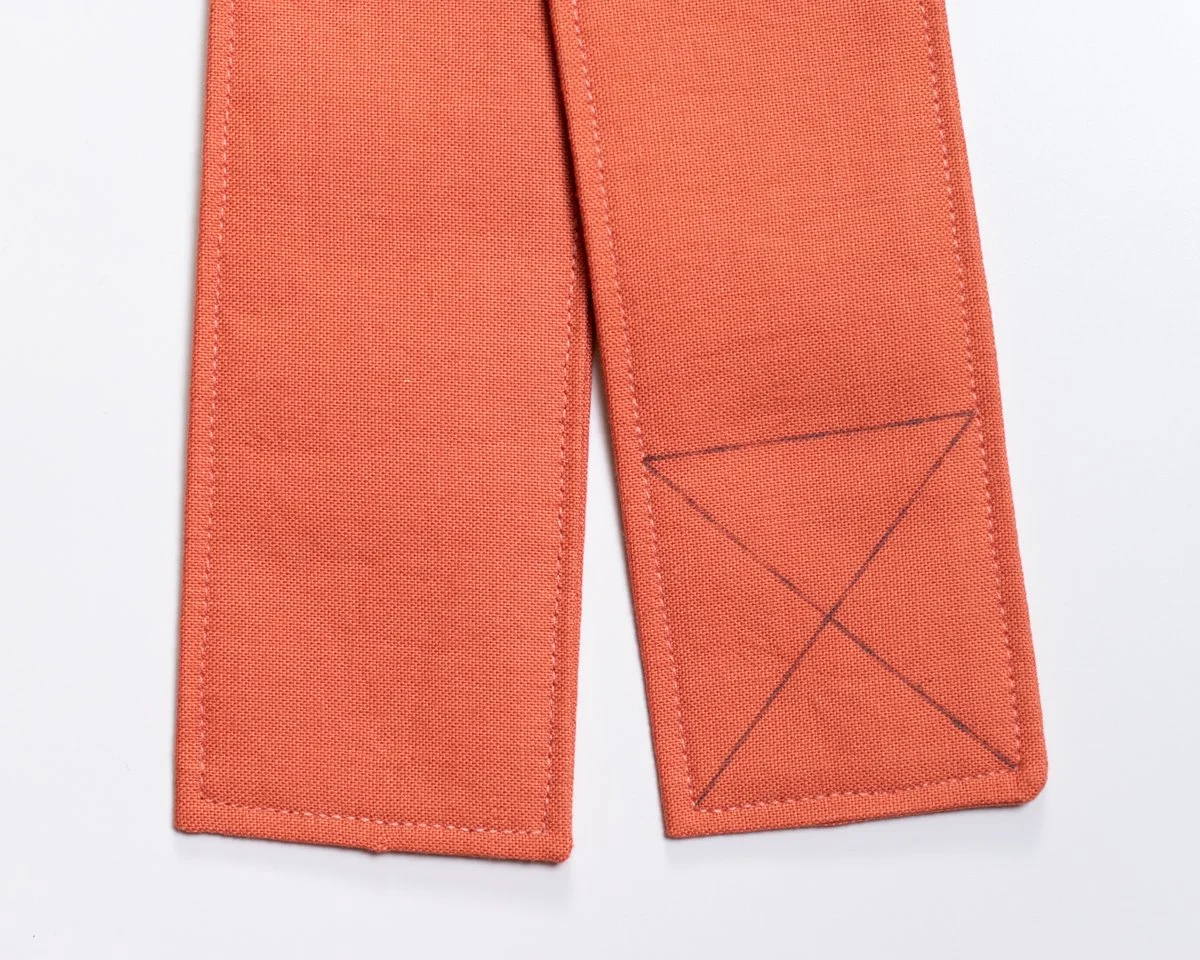
You’ll also see my strap’s edge stitching, an ⅛” away from the edge. I use that stitching as a guide to mark my square’s top line and the X inside.
9. Attach the straps to your heart panels.
Here’s my big secret about this bag: when I first made it, I didn’t measure a single thing, I just stitched it together on vibes alone. The reason you’re seeing a different sample in the tutorial was largely due to the fact that I needed to recreate the entire process and actually record what I did along the way.
The strap attachment, like the pocket attachment, is a bit up to you. One lady at Quiltcon told me she wished the straps were closer to the edge of the bag, another mentioned she wanted them to be lower on the bag to make them sturdier. I’m going to give you my basic instructions for attachment, but feel free to go rogue - this is your bag, so stitch it your way!
Lay out your first panel, outer fabric side up, and grab your first strap.
I laid out my 6 × 24” ruler on top of my panel, 2 ½” from the top of the heart’s humps.
Using your P2P Turner, mark a line 2 ½” from the top of the panel. This is just a positioning line and doesn’t need to be exact - I marked near the center of each hump. (Again, I can’t apologize enough for the number of times I’m going to use “hump” in this portion.)
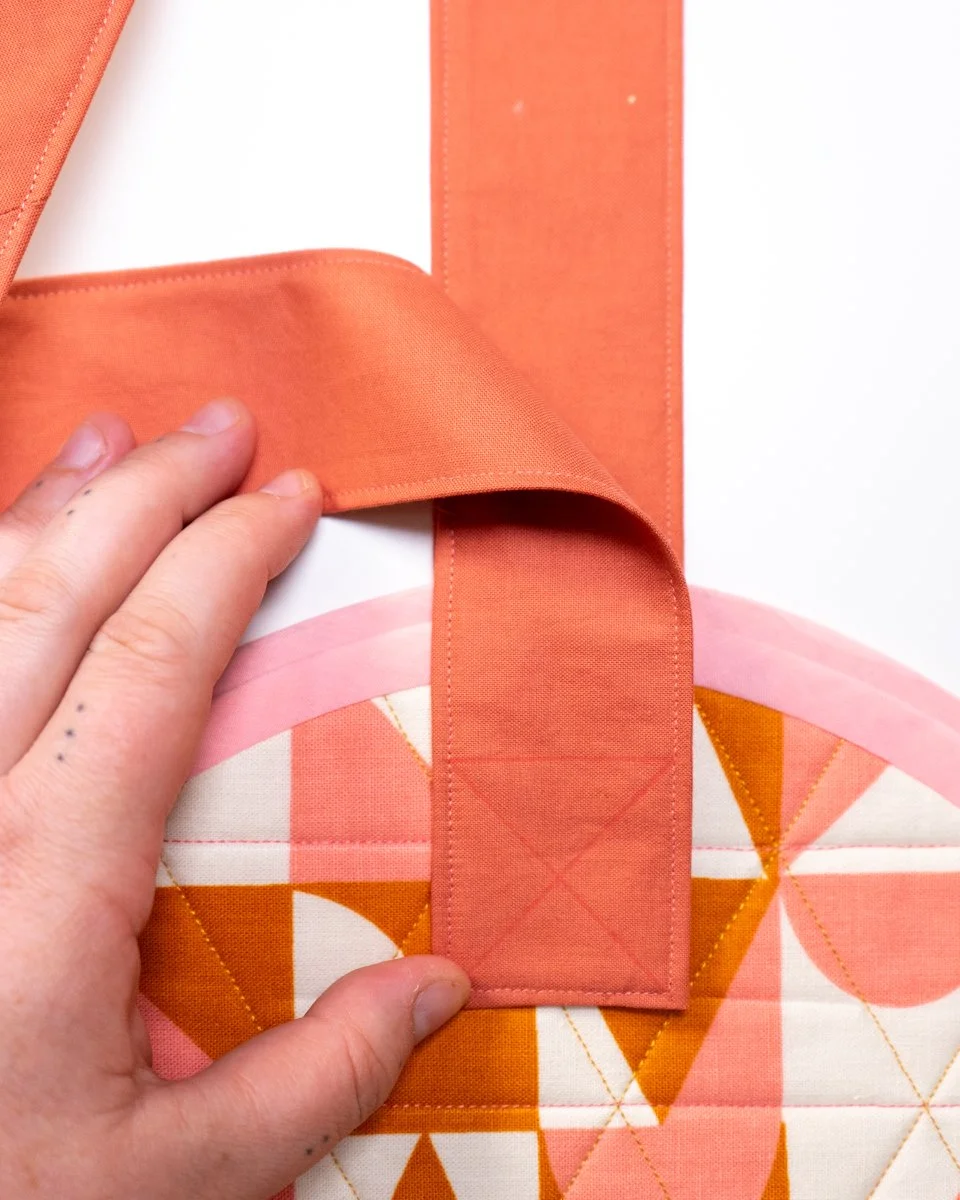
Eyeballing the center of each hump, pin down the ends of your strap onto your quilted panel. It’s important to double check that your strap is not twisted! I’ve messed this up more than once and it’s a pain to seam rip these strap ends, so please learn from my mistakes!
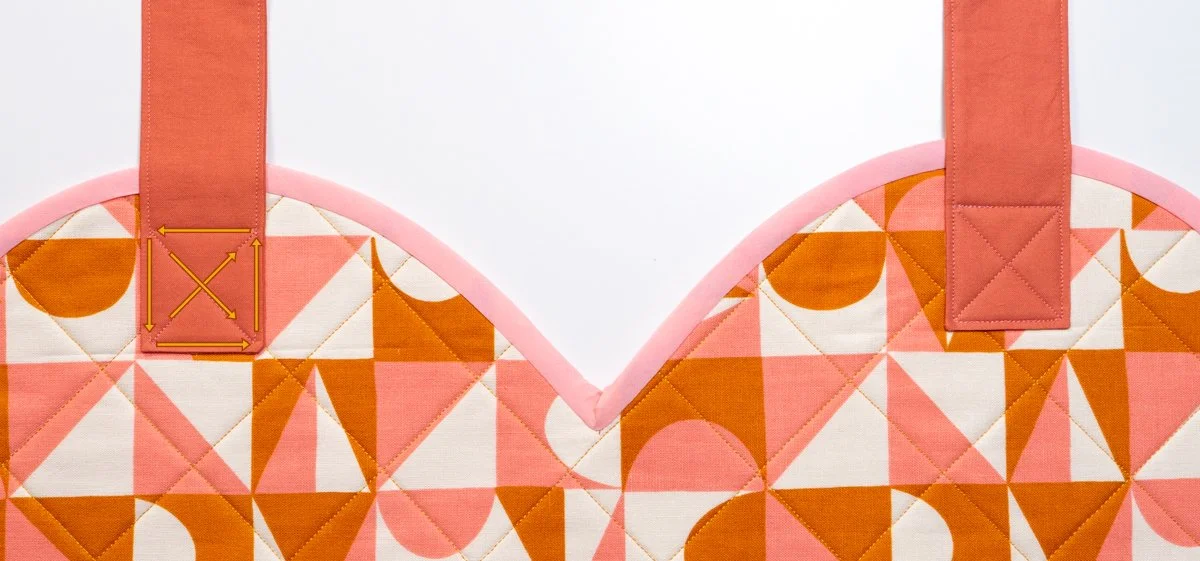
Stitch a boxed X using the ⅛” edge seam and the marked lines you previously created. You’ll end up sewing over one edge a second time, which is totally ok - I like to make sure it’s the top edge, so it’s extra sturdy!
Take a look below: on the left, I’ve used arrows to mark where I suggest stitching. On the right is the final result:
Repeat this process for each strap end. If you want a short cut for making sure your straps are in the exact same spot on each panel:
Once your first panel’s straps are stitched down, mark the same 2 ½” line from the top of the second panel. Next, lay down your first panel (with the straps attached), then lay the second panel directly on top, making sure the heart’s top humps are lined up.
Now, lay down the second panel’s straps, lining up the bottom with your 2 ½” line and the sides with the first panel’s straps. It’s hard to describe, so here’s a photo to help explain:
The finished panel is on the bottom, straps placed upwards. The second panel is placed on top, allowing me to line up the straps! You’ll see that I’ve marked my boxed X in red pen and the bottom on the strap end is lined up with a creased mark 2 ½” from the top of the panel.
Repeat the stitching process so you now have two panels with attached straps!
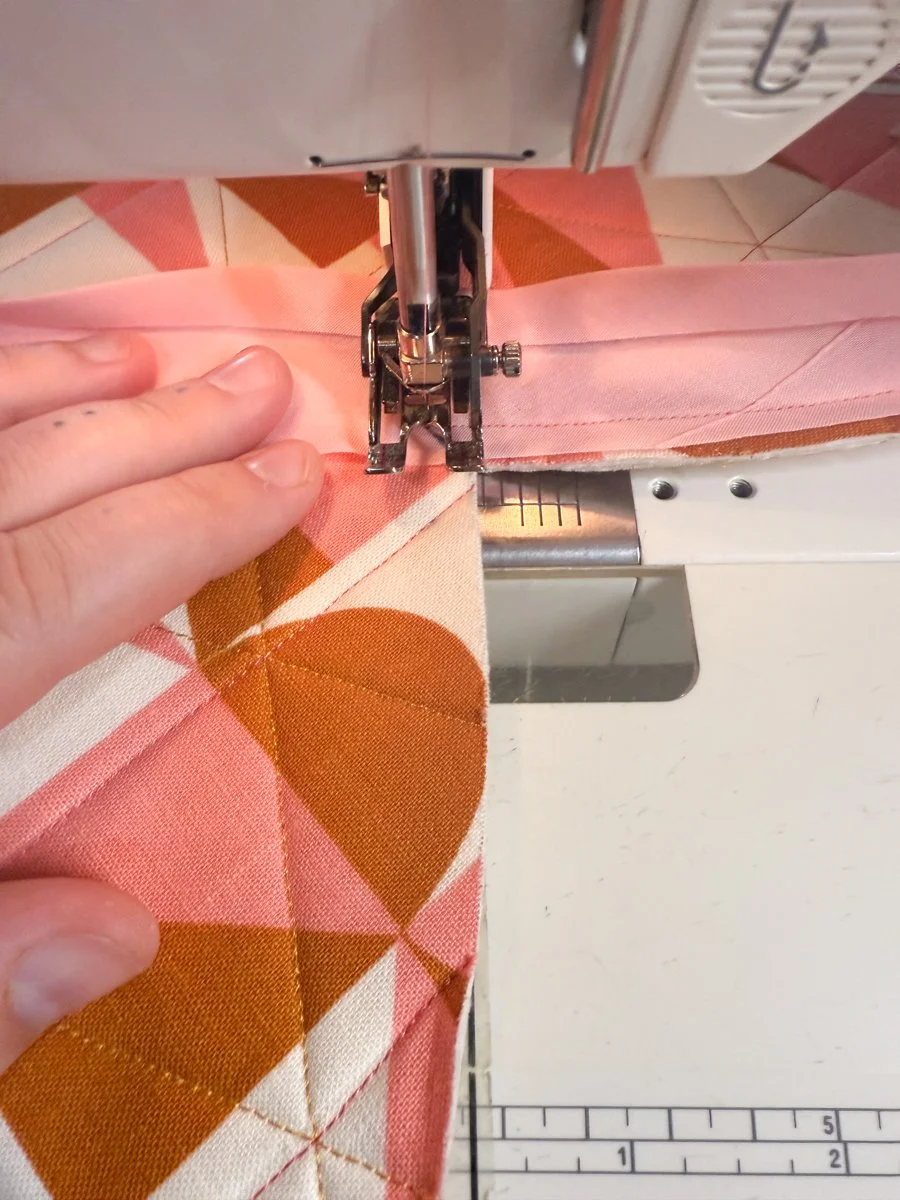
10. Sew your heart panels together.
Place your two heart panels, lining sides together. Clip or pin your panels together along the unbound edges.
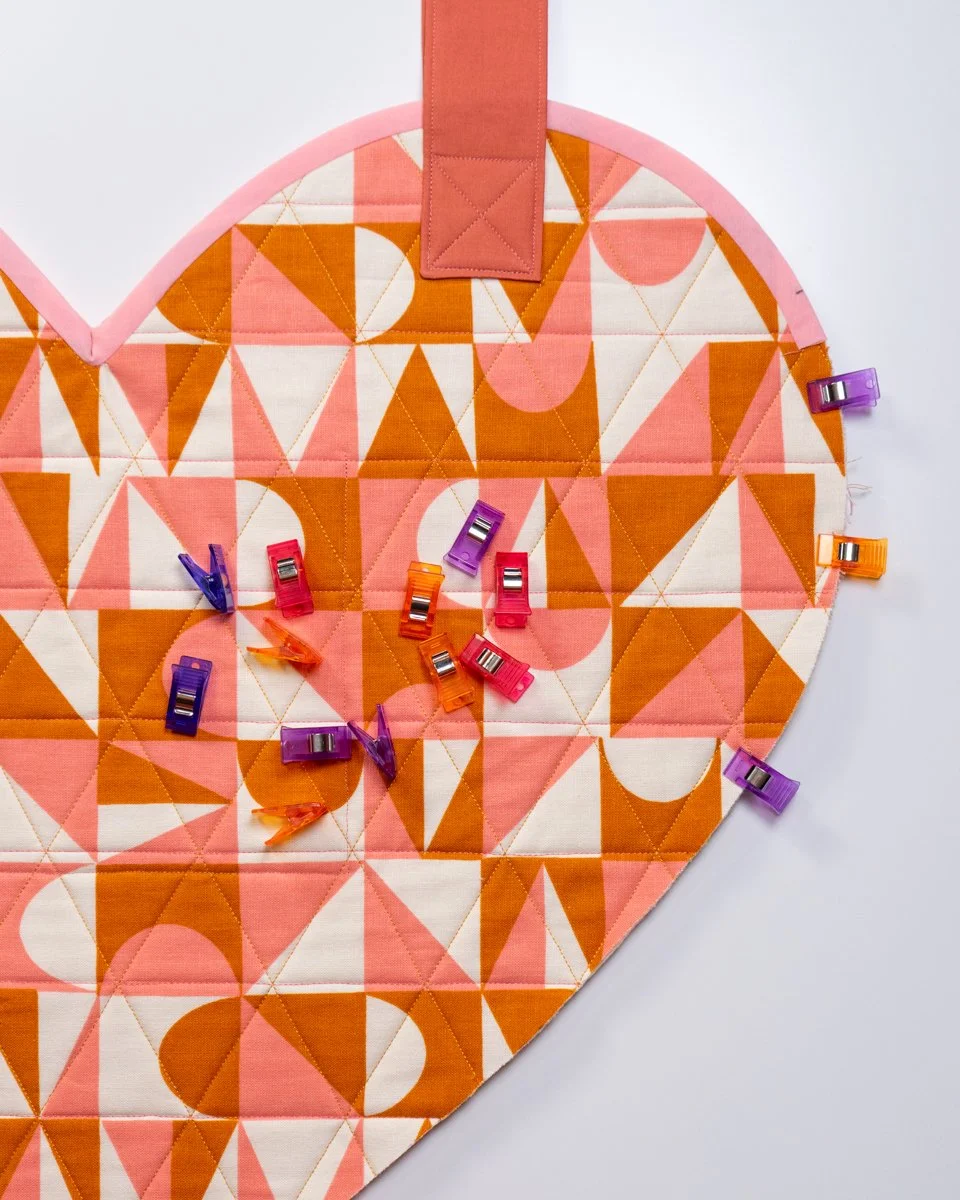
I suggest using clips here, they work better for the thick panels. You’ll also notice the small black mark on my pink binding - this is the opening mark from the template. Remember to mark it if you forgot earlier!
Sew ¼” along the bottom edge of the heart panels, from one opening mark to the next. Note: a walking foot works great here!
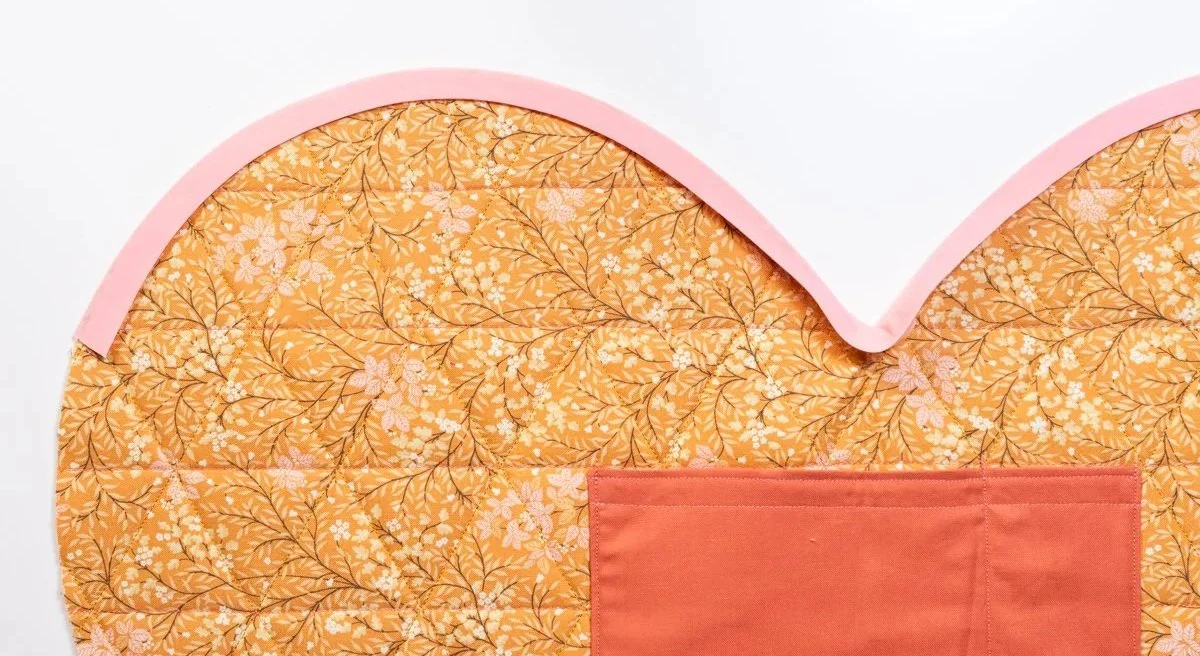
11. Attach the binding on the bottom of the heart panels.
You’ll be using the remaining binding, so no need to cut it down to size - you’ll trim, if need be, at the end.
Unfold your binding - you’ll be attaching it with the same method as you did in Step 7. At one end, fold over the short end by about ¼”:
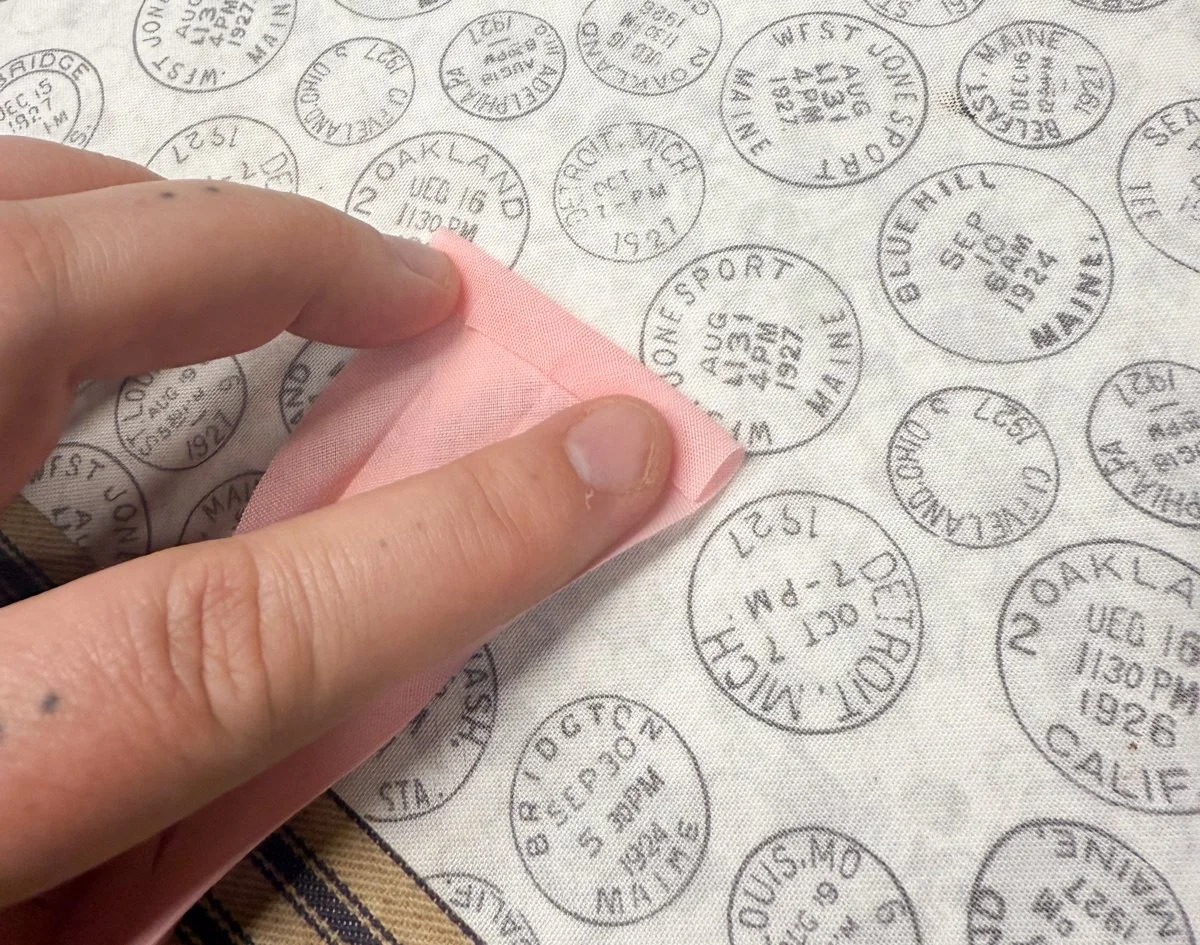
Iron down the fold to make it easier to sew into place.
Place the folded end on the opening mark. Clip into place. (This should overlap with your top binding, hiding the end!)
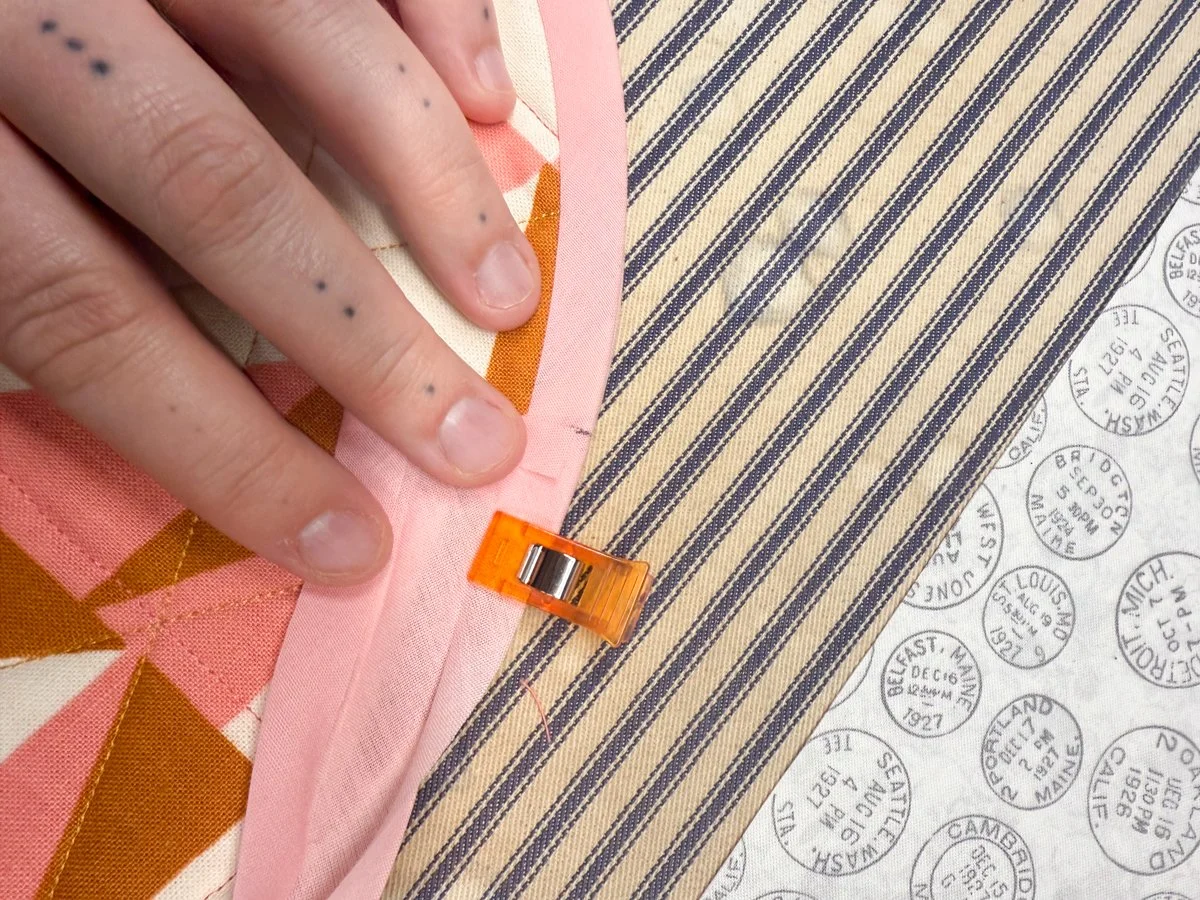
Sew along the creased line, about ⅜” from the edge.
You won’t have to deal with a dip along the bottom edge of the heart, just the tip. It’s easy, just slowly round the bias binding as you go.
Once you get an inch away from the second opening mark, trim your binding ¼” past the mark. Fold over the edge ¼” (I just finger press it here) to meet the second opening mark, then stitch down the remaining binding.
Flip over the binding and stitch down in the style of your choice!
Note: I like to hand sew my binding down and for this bag, it’s especially useful. At the two ends of the binding, I sew down the ENDS as well! This keeps the folded binding tucked under the edge - you might have noticed that it can kind of stick out.
If you’re machine sewing the binding down, consider adding some stitches to the ends!
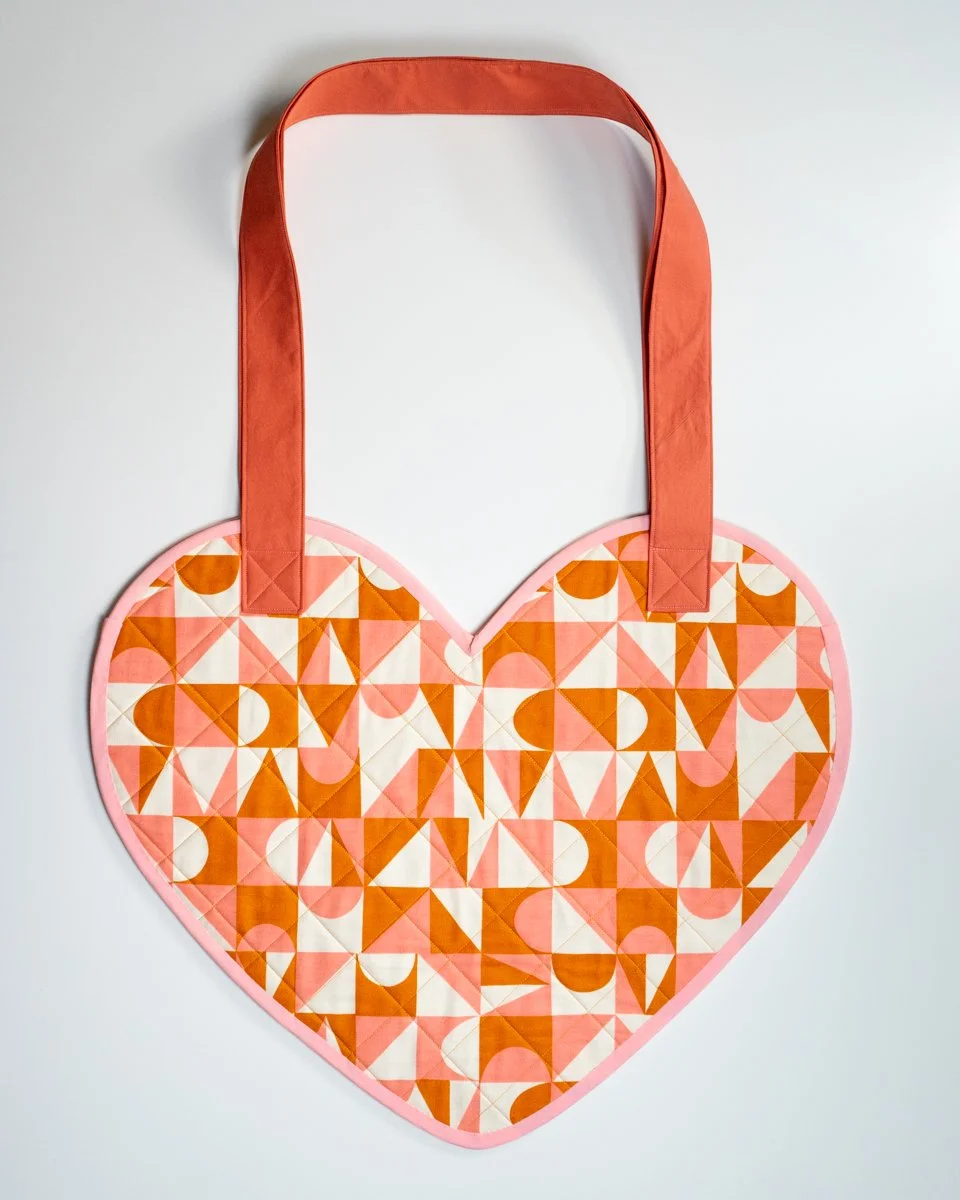
Voilà! Your bag is done!
Please feel free to reach out if you have any questions, I’m happy to help wherever I can. Some steps are tough to understand, even with photos, especially if you’re a beginner. That said, this bag is super easy for beginners and is very forgiving with any small mistakes you might make!
(P.S. You can email me directly at rozaleedesigns@gmail.com.)
Can’t wait to be back with my butterfly bag next month!
Happy sewing, my angels!